Wednesday 30 September 2015

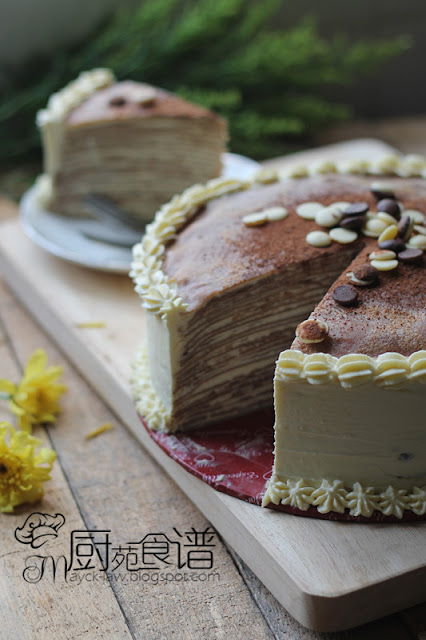
美禄咖啡千层蛋糕 【Milo & Coffee Mile Crepe Cake】


终于,做了这款不用烤箱的蛋糕, 
只要有个平底锅在手, 就能完成这款层层叠叠的蛋糕了。  
这蛋糕做起来,说难不难, 说容易又不易啊!
尤其是要煎出那一片片的可丽饼,真的是在考验人的耐性呢!
每次所倒入的面糊也尽量要一致,不能太多也不能太少。 
然后,才摇晃着锅子让那面糊成功的摊开,
少了几分能耐性都不行啊!
所以啊, 像我这样急性子的人,
向来对这款的蛋糕, 只能凝望几下, 
然后, 对它再投下几眼羡慕的眼光, 
却万万不敢将其纳入我的排行榜里呢!
可没想到, 为了解决宝贝儿子的生日蛋糕, 
更为了那半死不休的烤箱, 至今都不曾修理啊! 
所以, 才选择了这款不用烤箱的蛋糕。  
一来, 考验自己的耐性, 
二来, 这可是我的他,等了一年的蛋糕。  
自从去年, 在小丫头生日时, 吃了友人带来的千层蛋糕后, 
他总是那句, ”做千层蛋糕!“ 


果然, 像我这样没耐性的人, 煎出来的可丽饼就是这样的时厚时薄。 但是哦, 像我这样心躁急躁的人, 能成功的煎完这21片的可丽饼, 已经是非常难得的了。 嘻嘻。。。


【美禄咖啡千层蛋糕】

咖啡可丽饼材料:
240克低筋面粉
90克细砂糖
一小撮盐
4粒鸡蛋
650克鲜奶
35克即溶怡宝白咖啡(1包)
40克美禄粉
50克奶油(加热融化)

内馅: 700克鲜奶油, 60克糖粉 (打发)

芝士裱花材料:150克鲜奶油, 90克费城乳酪, 20克炼奶
- 将融化费城乳酪和炼奶以搅拌机打至均匀, 顺滑, 备用。
- 将鲜奶油打发至硬, 加入备好的费城乳酪, 搅拌至均匀。

装饰:可可粉, 巧克力粒
做法:
1.  将低粉,细砂糖和盐混合均匀, 备用。
2.  鲜奶加热至70度左右(微波炉叮2分钟), 加入即溶白咖啡和美禄粉, 搅拌至白咖啡和美禄粉融化均匀。
3.  加入鸡蛋, 以打蛋器将鸡蛋打散, 然后拌入低粉混合均匀。
4.  分3次加入步骤2的美禄咖啡鲜奶液体, 拌匀。
5.  最后拌入融化奶油, 轻轻搅拌面糊至顺滑。
6.  将面糊过筛,盖上保鲜膜放入冰箱冷藏至少一小时以上。
7.  取一平底不粘锅(26cm),以小火加热,在锅底刷上薄薄的一层融化奶油。
8.  倒入适量面糊, 并立即摇晃锅子使面糊摊成均匀的圆形薄饼。
9.  以小火煎约20秒,待面糊表面凝固后用手翻面,再煎8-10秒即可取出。
10. 重复以上煎面糊的步骤至面糊用完. (可煎成21张美禄咖啡可丽饼, 将煎好的可丽饼趁热平铺整齐地叠放好,盖上一块干净的布,放凉待用。)
11.  将鲜奶油和糖粉打发至表面呈现纹路。
12.  取一张可丽饼, 铺上打发鲜奶油, 以刮刀抹平,再叠另一张可丽饼,重复以上的步骤至完成铺完即成千层可丽饼蛋糕。
13.  然后, 在围边涂上芝士馅,再挤上裱花, 放入冰箱里冷藏至少4小时。
14.  取出筛上适量可可粉, 及撒下适量巧克力粒,即可切片食用。

可丽饼的食谱参考这里


【Milo and Coffee Mile Crepe Cake】

Milo and Coffee crepe :
240g cake flour/ superfine flour
90g castor sugar
a pinch of salt
4 eggs
650g fresh milk
35g instant Ipoh white coffee ( 1 packet)
40g milo powder
50g unsalted butter (melted)

Filling: 700g whipping cream, 60g icing sugar 
Decoration:cocoa powder, chocolate chips

Philadelphia Cheese Cream:
150g whipping cream, 
90g philadelphia cheese
20g condensed milk

Method:
1)  Whisk soften Philadelphia cheese and condensed milk until smooth, set aside.
2) Whipped the whipping cream until stiff peaks, add in cream cheese (method 1) and mix well. 

To make crepe cake :
1.  Combine cake flour, castor sugar and salt, mix well. 
2.  Heat fresh milk to 70 degree celsius or use microwave heat for 2 minutes , add instant Ipoh white coffee and milo powder, mix well until it dissolved.  
3.  Add in eggs and hand whisk until it combine.  Then, sift in cake flour and mix it well.  
4.  Gradually add in coffee liquid and mix well
5.  Lastly, add the melted butter and whisk gently until smooth.  
6.  Sift the batter, cover with cling wrap and place it in the fridge for at least 1 hour. 
7.  Heat a 26cm non-stick pan on low heat and brush the pan with melted butter. 
8.  Pour the batter into the center of the pan, and then quickly swirl the batter around to make a crêpe the size of the bottom of the pan. 
9.  Cook for 20 seconds, flip and continue cook for another 8-10 seconds. 
10.  Repeat, and continue making the rest of the crêpes. If the non-stick coating on your pan isn’t damaged you shouldn’t need to butter the pan again, but if the crêpes start sticking to the pan, keep buttering the pan. (makes 21 pieces of crepes and cover with clean cloth until it cold)
11.  Whipped the whipping cream and icing sugar until stiff peaks. 
12.   To assemble the cake:  Lay a layer of crepe, then spread an even layer of whipped cream on top.  Continue layering to complete the whole crepe cake. 
13.  Then, spread the whipped cheese cream overr the sides of the cake.  Place the cake in the fridge for at leave 4 hours or overnight.
14.  Dust with cocoa powder and sprinkle with chocolate chips on top of the cake. 


其实,起初是选了芒果口味的千层蛋糕。 但是, 考虑到大小丫头都不爱, 所有才临时决定做了美禄咖啡口味。 然而, 才刚铺完这蛋糕, 大少爷“路过”扫了几眼这蛋糕,  惊讶的问道," 这个歪来歪去的蛋糕, 是我的生日蛋糕?" 停顿了一下又笑嘻嘻的说,”妈咪, 其实我不介意你去买一个蛋糕叻!“

我心知肚明, 这蛋糕啊果然是不合格!然后, 就静悄悄的将它收藏于冰箱的一角,然后又不动声色的取出, 将它“打扮”了一番。再然后啊, 就快手的做了另一款“较为安全”的生日蛋糕。而这“Y来Y去”的蛋糕, 就待夜晚一同和那生日蛋糕齐齐出现吧! 

可是, 别小看这"YY"的它, 配着浓浓奶油和那围边的芝士裱花馅, 再加上软糯的饼皮, 混合一口入嘴, 心中强烈地高喊着, 这火红的蛋糕, 果然是美味极了! 


经典歌曲是这样唱的, “美酒加咖啡, 我只要喝一杯。。。。" 
而我家的歌儿是这样唱的,“美禄加咖啡。。。。”  嘻嘻! 
美禄没什么香味, 于是就加入了咖啡,成了美禄加咖啡的千层蛋糕!


littlethumbups1-1

This post is linked to – Little Thumbs Up September 2015 (Milo) organised and hosted by Zoe from Bake for Happy Kids and Doreen from My Little Favourite DIY.


Tuesday 29 September 2015

美禄巧克力滴柳叶包 【Chocolate Chips Milo Pao】


美禄(Milo),是每个大马人所熟悉的字眼, 
也是你我楼心刻骨的儿时记忆吧! 
尽管, 儿时的许多事物都随着时光渐渐模糊,
然而, 有些记忆却依然清晰可见。
那些年, 穿梭在校园里的那辆milo车,
总会让人欣喜雀跃, 纷纷高呼着“milo车来咯。。。”
然后,就刻不容缓的纷纷排队去喝美禄了。
非常珍贵的捧着那小小的一杯美禄,
每每喝下那一口冰凉的美禄,
总觉得那是世间最好喝的饮料,
那份喜悦浇灌了你我干涸的心田吧!
如今, 回想起那辆“milo车”的记忆,
心中不免充满着柔柔的情, 融融的意。
怀念那份milo车所带来的惊喜与喜悦,
怀念那段金色的童年。


为这个月小拇指的活动, 带来了这款姗姗来迟的美禄包子, 加入巧克力滴内馅, 深受孩子们的喜爱!


巧克力滴美碌柳叶可做12个 

皮料:
250克包粉
少许盐
1小匙即溶干酵母
40克細糖
40克美碌+130克热水(调匀, 待凉)
15克白油

** 1/2 大匙泡打粉


馅料巧克力滴

做法

1. 将所有皮料(除了泡打粉)混合均匀, 搓成光滑的面团,盖上湿布休面让它发酵至双倍大。
2.  加入泡打粉, 充分将其混合柔至均匀, 盖上湿布松弛20分钟。 
3.  再度轻柔面团, 分割成12份, 搓圆擀成中心厚, 外围薄的圆片, 包入2大匙巧克力滴, 收口。 
4.  放在蒸盘上, 待发15分钟至按下面团有弹性。
5.  待水滚后,放入蒸笼里,以大火蒸约15分钟即可。 放置2 分钟后才开盖。  


温馨提示:  面团加入了泡打粉必须充分的搓揉至均匀混合, 否则蒸好的包子皮会出现小褐点。 


【Leaf Shapes~ Chocolate Chips Milo Pao

Skin ingredients :

250g pau flour
a pinch of salt
1 tsp instant yeast
40g sugar
40g milo powder + 130g hot water (mix well and let it cool)
15g shortening

** 1/2 tbsp baking powder

Filling:Chocolate chips

Method
1.  Mix all the skin ingredients (except the baking powder), knead into a smooth and elastic dough. 
4.  Add baking powder and knead evenly, rest for 20 minutes.
5.  To knead the dough again, and divide the dough into 12 portions.  To shaft a round shape and wrap in 2 tbsp chocolate chips,  seal up.
6.  Place it onto well organized steamer for fermenting 15 minutes.
7.  Moving into boiled steamer and steam it for 15 minutes, and let it stay for 1 minutes before open the steamer. 

Tip:  You have to knead well after adding in baking powder, otherwise there will be small brownish spots on the pau skin.


This post is linked to – Little Thumbs Up September 2015 (Milo) organised and hosted by Zoe from Bake for Happy Kids and Doreen from My Little Favourite DIY.

Sunday 27 September 2015

芝士上海月饼 【Cheesy Shanghai Mooncakes】


说着说着, 又到了中秋,  中秋节本就是一家团圆的日子。   所以, 今日就长话短说, 不谈嫦娥奔月的故事了, 因为我也要赶着去提灯笼了! 嘻嘻。。。

 在这里祝大家中秋节快乐, 老老小小都欢聚一堂哦!


【芝士上海月饼, 可做14粒 食谱参考这里

皮料:
100克糖粉,280克面粉, 50克奶粉, 35克蛋黄粉,45克帕馬森乳酪粉, 1 茶匙发粉
100克白油, 50克奶油, 2粒鸡蛋(打散)

830克白莲蓉馅+40克烤香瓜子
14粒咸蛋黄

做法
1。 将馅料+白瓜子搓匀, 平分成每粒60克, 备用。
2。把咸蛋黄排在烤盘里, 喷上花雕酒,以170度烘10分钟,取出待凉。
3。将馅料按扁,包上咸蛋黄,搓圆。
4。将糖粉过筛, 加入面粉, 奶粉, 蛋黄粉, 芝士粉以及发粉, 混合均匀。 
5。加入白油和奶油, 以手指揉成粉类状, 加入蛋液以刮刀搅拌均匀成软团, 静置30分钟至不粘手即可使用。
6。将面团平分成每份50克, 压扁包入一份馅料,搓圆。.
7。放入预热烘炉,用170度烘烤15分钟, 取出。 静置10分钟至冷却, 涂上蛋黄液, 撒上黑白芝麻, 继续烘烤20分钟至金黄色即可。 


【Cheesy Shanghai Mooncakes】

Skin Ingredients:
100g icing sugar, 280g all purpose flour, 50g full cream milk, 35g custard powder
45g parmesan cheese, 1 tsp baking powder
100g crisco shortening, 50g unsalted butter, 2 eggs (beaten)

Filling:
830g white lotus paste + 40g roasted melon seeds
14 salted egg yolks

Method
1。 Combine white lotus paste with roasted melon seeds and divide into 60g each , set aside.
2.   Arrange salted eggs in a baking tray and spray with shaoxing wine.  Bake at preheated oven at 170C for 10 minutes, remove and let cool it.
3.   Shape the lostus paste into a balls, flatten it.  Then, wrap with salted eggs and shape it into a balls. 
4.  Sift the flour, milk powder, custard powder, baking powder and add in parmesan cheese, mix well.  Then, add in sifted icing sugar, mix  well.
5.  Add crisco shortening and butter, use your fingertips work with all the ingredients until it resembles bread crumbs.  Add in beaten egg and combine into soft dough. Let it rest for 30 minutes.
6.  Divide dough into 50g each, shape into a balls and wrap in filling, shape it into a balls.
7.  Bake in preheated oven at 170C for 15 minutes, remove it from oven and let it cool for 10 minutes.   Brush  mooncakes with glaze (egg wash)  and garnish with black and white sesame on top of the mooncakes . Then, return to oven and continue to bake for another  20-25minutes or  until golden brown. it 


还是炉热烘烘的月饼, 等不及散热, 马上随手拍了几张就出货了!
所以, 也不分享切片的内在美咯!


Friday 25 September 2015

提拉米苏芝士巧克力月饼 【Tiramisu Cheese Chocolate Mooncake】


 家里有个喜欢巧克力的她,凡是看到有着巧克力字眼的食品, 
她都不放过。 
每当她温书时, 总会要求买些巧克力以作陪伴, 
她说,有了巧克力作伴, 她便会振作。  
随着那份甜滋滋的巧克力入口, 
什么懒虫都爬不上身了。

   她说, 那是一股令人振奋的幸福滋味,
所以啊, 巧克力不但是她的良药, 
也是她的精神支柱。 
遇到那要命的考期, 巧克力也和她一起并肩作战了! 


巧克力,有不同的味道,有甜有苦。甜的让你沁入心底,而苦的却让你难以下咽。把巧克力变成了月饼, 总觉得少了那份甜丝丝的感觉, 而却多了一份浓浓的苦涩。相较那些其它的月饼皮, 这款巧克力口味的月饼, 实在是值得让人回味啊!

虽然, 没多久前才贴上巧克力月饼。所不同的是, 这批的巧克力月饼加入了自制的芝士馅, 还有那香醇浓沉的提拉米苏口味。巧克力的馥郁, 乳酪的稠香,提拉米苏的香醇, 哇!完美的组合,受不了吧!


【提拉米苏芝士巧克力月饼, 可做16个

巧克力饼皮食谱参考这里

内馅
400克市场购买的提拉米苏
160克市场购买的白莲蓉

芝士内馅材料:(可做20粒)
250克费城奶油乳酪 (室温软化)
40克淡奶
20克炼奶

芝士乳酪做法
1) 将费城奶油乳酪, 淡奶和炼奶搅打均匀至顺滑无颗粒。
2) 舀入圆形蛋黄模型里, 填满, 放入冰箱里冷藏大约2-3小时至凝固。 (我用3排的圆形模型)
3) 取一份白莲蓉馅, 包入一粒芝士馅, 搓圆。
4) 再取一份提拉米苏馅, 最后包入以上步骤3的内馅, 放入冰箱里备用。

月饼做法
1) 从冰箱里取出提拉米苏芝士内馅,将巧克力饼皮擀成扁圆形, 包入内馅, 收口收紧,搓圆。 
2) 将裹好的月饼放入月模内,以手指紧压, 直接压入烤盘上。
5. 送入预热.烤箱以175度烘烤10分钟, 取出, 待冷。 静待5分钟再送入烤箱里, 继续烘烤10-15分钟即可。 

** 月饼的重量是75克, 饼皮~30克, 芝士内馅~10克, 白莲蓉~10克, 提拉米苏内馅~25克


【Tiramisu Cheese Chocolate Mooncake

Chocolate mooncake skin , please refer HERE

Filling

400g tiramisu paste (purchased from market)
160g white lotus paste (purchased from market)

Philadelphia cheese filling::(makes 20 pieces)

250g philadephia cheese (room temperature)
40g evaporated milk
20g sweetened condensed milk


To make cream cheese filling

1)Combine philadephia cheese, evaporated milk and condensed milk,  whisk until smooth and without any lumps.
2)  Scoop the mixture into ice tube rounded mould and keep to set in the fridge for about 2-3 hours. 
3)  Wrap cheese filling with white lotus and shape it into a ball.
4)  Then, wrap the cheese balls with tiramisu paste, shape it into a ball and put it into the fridge to be used later.

To make mooncakes:

1)   Remove cheese filling from fridge, wrap up with chocolate skin and seal edges.
2)  Press into a moonake mould, slowly remove the mooncake and place directly on a baking tray.
3)  Bake in preheated oven at 175C for 10 minutes, remove from oven.  Let it cool for 5 minutes and return mooncakes to oven , continue to bake for 10-15 minutes.

** made 16 of  75g mooncakes: 
Weigh of skin ~30g,  cream cheese filling~10g,  white lotus paste~10g and tiramisu paste~ 25g


五仁月饼, 参考这里


Thursday 24 September 2015

广式五仁月饼【Traditional Mixed Nuts Mooncakes】


虽然市面上奇葩口味的月饼繁多,
然而他唯独青睐于传统式的五仁月饼, 
谈及广式月饼, 一般都是薄皮馅多, 
而他却将其改为厚皮馅少的。 
其实, 总多月饼中, 
我最不喜欢的就是五仁月饼。 
纵然是不爱, 却也年年都得为它而忙。 
每当月饼飘香时, 他也总会捎来一句, 
“记得买五仁馅, 可别把它给忘了!”
这款月饼的内馅, 具有多种的果仁搭配, 
就因如此, 也被他称为是最健康的月饼!


【传统五仁月饼, 可做16个

月饼皮材料
300克低筋面粉、210克糖浆、55克花生油、1/2小匙碱水

内馅: 640克市场五仁馅 (每个40克)

做法
1。 把糖浆,碱水和花生油混合均匀后, 以小火至煮至小滚 (必须不停搅拌)。
2。 待稍微冷却后, 加入面粉混合成面团。静置2小时至不粘手后才使用。
3。
将饼皮面团平分割成每份35克,搓圆。

4。将饼皮擀成扁圆形,包上一份五仁内馅, 收紧封口,搓圆。
5。将裹好的月饼放入月模内,以手指紧压, 直接压入烤盘上。
6。送入预热.烤箱以175度烘烤10分钟, 取出, 静置10分钟, 涂上一层蛋液。 
7。再送入烤箱里, 继续烘烤10-15分钟或上色即可。
8。月饼取出后,放在铁架上散热, 待回油2-3天后即可享用。

** 我做了以上双倍的分量, 以1公斤市场购买的五仁馅,加入了以下的材料:
30克麦芽糖
50克烤香白瓜子
30克黑白芝麻
50克烤香杏仁粒
50克烤香核桃


【Traditional Mixed Nuts Mooncakes, makes 16 mooncakes

Dough Ingredients
300g High Ratio Flour, 210g Golden Syrup, 55g Peanut Oil or Cooking Oil
1/2tsp Alkaline Water or Lye Water


Filling: 
640g mixed nuts paste  (40g each)
(I used 1kg mixed nuts paste which purchased from the market and  mix with the following ingredients:)
20g maltose
50g roasted melon seeds
30g roasted white and black sesame
50g roasted almond
50g roasted walnut


Method
1. Combine all the ingredients in a pot, stir over low heat until golden syrup softens or stir until just boiled.  Remove from heat and set it aside to cool.
2.  Add in flour into syrup mixture, mix to form a soft and smooth dough.  Cover dough with plastic clip wrap, let it rest for 2 hours at room temperature.
3.  Divide dough into 35g each, shape into balls.   
4.  Flatten a portion of dough, place a ball of filling in the centre, wrap up and seal edges.
5.  Press gently into a mooncake mould, slowly remove the mooncake and place on a baking tray. 
6.  Bake in preheated oven at 175C for 10 minutes, remove from oven and leave mooncake to cool for 10 minutes. Brush mooncakes with glaze (egg wash) .
7.  Return mooncakes to oven and continue to bake for 15 minutes.
8.  Remove from oven and store mooncakes for 2 days to allow pastry to soften before serving. 


Related Posts Plugin for WordPress, Blogger...