Monday, 22 June 2015

酸奶戚风蛋糕 (Yogurt Chiffon Cake)


向來都堅信著自己是堅強的,
那一刻才知道, 原來以往一直都在偽裝著堅強。
“山洞”裡雖是燈火映照, 然而那恐懼卻填滿我的心靈。
”山洞“裡雖無虎豹豺狼, 然而那可駭感卻讓我哆嗦顫抖。
”山洞“裡雖是雪窖冰天,然而那驚駭卻足以讓我汗如雨下。
就這樣靜靜地讓那份懼怕蔓延著全身,
此刻, 只想高喊快快離開這個令人害怕的鬼地方。
那一刻, 手心淌汗,腳掌頭皮發麻,全身出虛汗,
害怕再也走不出這”山洞“,害怕“山洞”中會藏匿魔鬼。
那一刻, 心兒砰砰直跳, 連大氣也不敢呼,
那一刻, 害怕就這樣被這“山洞”吞噬掉了!
那一刻, 那份懼怕讓我徹底的崩潰了!


# 忽然覺得繁體字比較美, 今天就懷舊讓它復古吧!


又胡言亂語的出題了, 只想記載下那日“曾經滄海”被困於“山洞”裡的懼怕感。以便警惕自己要多愛惜自己, 多保重身體, 千萬不要再重回到那像極了一副”棺木'的山洞裡了。


為了掩飾酸奶的味道, 加入了少量的巧克力粉, 只為了取悅那嘴刁的大丫頭。


【酸奶戚风蛋糕】


材料:
5粒蛋黄
50克玉米油
60毫升酸奶
80克低筋面粉
大匙巧克力粉+1大匙热水, 拌匀

5粒蛋白 
90克幼糖

做法
1在搅拌盆中以打蛋器打散蛋黄,加入幼糖,玉米油及酸奶搅拌均匀。
2.  加入过筛面粉, 搅拌均匀至无颗粒的面糊拌匀, 备用。
3.把蛋白以搅拌机打发至呈粗泡沫状,将細糖分3次的加入,继续打发至硬性发泡。 
4.蛋白糊分次加入蛋黄糊里,搅拌均匀。 
5.  取出1/3的面糊, 加入巧克力酱, 另一份则保持原色。  
6.  将两份蛋糕糊交替的倒入21cm空心戚风模子里, 轻轻的轻轻敲出小气泡。 
7.  送入预热165度烤箱里, 烘烤50分钟即可。 
8.  取出蛋糕,倒扣在桌子上,待完全冷却后脱模.

**给自己的小记录: 小烤箱的温度, 前165度烘烤35分钟, 后150度烘烤15分钟。 


【Yogurt Chiffon Cake

Ingredients:
5 egg yolks
50g corn oil
60g yogurt
80g high ratio flour
1 tbsp cocoa powder + 1 tbsp hot water, mix well

5 egg whites
90g castor sugar

Method
1. Combine egg yolks, sugar, corn oil and yogurt in a mixing bowl. 
2. Fold in cake flour, mix until there are no more lumps and forms a smooth batter, set  aside.  
3. Whisk egg whites until mixture forms soft peaks, and gradually add in sugar, whisk until frothy and still peaks form.
4. Gently fold in egg whites into egg yolk batter until blended. 
5. Remove 1/3 of the batter, mix in cocoa paste and mix well.
6. Pour the two types of batter into 21cm chiffon mould, lightly tap the pan to remove air bubble.  
7. Bake in preheated oven at 165C for 50 minutes or until cooked. 
8. Remove from oven, invert cake onto table until completely cooled. 


Best_Recipes

I am submitting this post to Best Recipes for Everyone: BREE #10 Secret of Chiffon & Roll Cakes organised and hosted by Fion of XuanHom’s Mom


Sunday, 21 June 2015

奇异果西米露 (Kiwi Sago Dessert)


又见2粒熟烂的奇异果, 就放入果汁机里打烂它, 加入一些西米露也不错吧!西米露原是淡而无味,加入酸而带甜的奇异果,口感则完全不同了。  


【奇异果西米露, 可做2杯

材料:
2粒 奇异果
20-30克沙谷米/西米 (洗净)
蜜糖或細糖
酸奶

做法
1. 将沙谷米及清水放入锅中,水量要盖过沙谷米。沸滚后, 要不停的搅拌,防止糊底,煮到大部分西米开始变透明,起锅冲水。 
2. 再将清洗过的沙谷加入适量的热水, 继续以小火煮至沙谷剩余一些白点。必需不停搅拌), 离火, 盖上盖子至沙谷完全熟透, 清洗表面的糊状, 过滤备用。
3.  将奇异果削皮,放入果汁机中榨成汁,然后放入煮熟的小西米搅拌均匀即可。
4.  甜度不够,可以加些蜂蜜或糖、酸奶等等。 (根据个人喜爱)。


【Kiwi Sago Dessert, makes 2 cups


Ingredients:
2 kiwi 
20-30g sago 
honey/sugar
yogurt

Method:
1. In a small pot, cook the sago with some water, simmer with small heat until the sago had turned partially translucent but still can see some white dots. (Occasionally stir the sides and bottom of the pot to prevent sticking. ) 
2. Rinse the partially cooked sago through a sieve with running water and to remove the excess starch.
3.  Add hot water into the sago, continue to cook with a small heat, until you can see the sago with some small white dots .  Turn off the flame. 
4.  Cover the pot with lid and just let it stand for 10 minutes.  The sago will  turn fully translucent.  Rinse the cooked sago through a sieve with running water and keep sago in a bowl of water, set aside. 
5.   Peel the kiwi, put into the blender and blending until smooth.  Add cooked sago, mix well.
6.  You may add some honey or sugar if you need more sweetness and the yogurt. 


Friday, 19 June 2015

酒香鱼鳔 (Fish Maw In Wine)


鱼鳔是家里的传统年菜, 春节的餐桌上, 总是少不了它。 过年过节, 最忙碌的莫过于在厨房里煮妇们了, 绞尽脑汁的为家人预备着丰盛的团圆饭。 春节里,我总是两头奔,南上北下的两头吃, 最高兴的就是不再烦, 今天煮什么的, 吃什么的。

鱼鳔是那老的最爱, 除了酸辣鱼鳔, 这道鱼鳔的煮法也是他的最爱!

#春节时, 煮了这道菜肴, 今日就一按键“publish"而去吧!#


【酒香鱼鳔】

 材料
60克鱼鳔(炸过, 切块, 浸水15分钟,沥干)
20克黑木耳(以热水浸软, 去硬蒂切小块)
10只中虾(剥背去肠泥, 洗净)
4 朵冬菇(浸软, 去硬蒂)
1罐鲍鱼(切片)
1条红辣椒 (切段)
2棵青葱(切段)
2碗江鱼仔高汤
5瓣蒜 (切片)
5片姜
2 大匙粟粉水

调味料
2小匙盐, 6大匙绍兴酒, 1大匙鲍鱼汁, 少许胡椒粉

做法
1.    烧热2大匙油,爆香姜片和蒜片, 加入黑木耳, 冬菇略炒几下。
2.   注入高汤和调味料, 加入炸好的鱼鳔, 虾子和鲍鱼片翻炒均匀, 煮至沸滚。
3.   起锅前撒下青葱, 加入少许粟粉水勾茨拌匀, 试味, 盛起即可享用。


【Fish Maw In Wine】

Ingredients
60g fish maw(cut into small pieces and deep fry)
20g black fungus(soaked, removed hard stem, cut into small pieces)
10 large prawn (deveined and rinsed)
4 mushroom (soaked and removed hard stem)
1 can of abalone(sliced)
1 red chili (sliced)
2 stalks spring onion(sectioned)
2 bowls of Anchovies stock
5 pips garlic (sliced)
5 slices ginger
1 tbsp cornstarch water

Seasonings
2 tsp salt, 6 tbsp Shaoxing rice wine, 1 tbsp abalone sauce, a dash of pepper

Method:
1.   Soaked fish maw for 15 minutes, squeezed dry.
2. Heat up 2 tbsp oil, saute garlic and ginger until fragrant.  Add black fungus and mushroom and stir well.
3. Add in anchovies stock and seasonings, mix well. Add in fish maw, prawns and abalone, bring to boil.  
4. Lastly, thicken with cornstarch water, add in spring onion and stir well. Dish up and serve.


好久以前煮过这道酒香鱼鳔, 照片储存了6个月多,今天就一起贴上了。(稿子写在6个月前, 而今是一年之久了, 呵呵!)


Thursday, 18 June 2015

黑巧克力蛋糕卷 (Dark Chocolate Swiss Roll)


说到蛋糕卷,要不嘛,就久久不卷,
一旦开动了卷功,就得每日一卷了。
樱花卷,  又来了第二卷~黑巧可力口味, 
然后就手不停止的卷着, 卷风不熄啊! 
采用了这个家人喜爱的食谱,
总是让我不失败的成功卷起蛋糕。
做过了无数次黑巧克力口味的蛋糕卷,
就是迷恋它那幽幽淡淡的香气, 
又深受孩子们的喜爱, 
我也乐而不厌的卷了一卷又一卷!


【黑巧克力糕卷】
烤盘23cm x 27cm

材料
3粒大蛋(约165克), 70克細糖, 40克低筋面粉, 12克可可粉, 25克鲜奶

内馅: 
120克鮮奶油, 15克細糖

做法
1. 将鸡蛋和細糖以电动搅拌机打发至浓稠,画过的面糊稍后才消失。
2. 将低筋面粉和黑巧克可粉混合过筛,倒入打发的的做法(1)蛋液中,翻拌均匀。 
3. 分次的加入牛奶,并搅拌翻拌至均匀。
4. 将面糊倒入铺放油纸的烤盘里, 铺平, 放入预热烤箱以165度,烘烤20分钟出炉。
5. 取出, 将四边的油纸撕开, 放在铁架上冷却。 
6. 这时, 将内馅的鲜奶油加入細糖打发, 备用。
7. 将蛋糕底部的油纸撕下,再重新更换一张油纸,将蛋糕表皮朝上,抹上奶油, 并小心卷起。
8. 放入冰箱冷藏室待蛋糕固定后,再切片。


【Dark Chocolate Roll】
Baking tray : 23cm x 27cm
Ingredients
3 eggs(165g), 70g castor sugar, 40g high ratio flour
12g dark chocolate powder, 25g fresh milk

Filling: 
120g whipping cream, 10g castor sugar

1. Mix flour and dark chocolate powder and sieve, set aside. 
2. In a bowl, combine eggs and sugar and whisk until pale, thick and fluffy (approximately 10-15minutes) 
3. Add flour mixture into the egg mixture, whisk until smooth and well combined.
4. Pour the fresh milk over the batter, and use a spatula mix well until incorporated. 
5. Pour the batter into cake pan with lined parchment paper and lightly tap the pan to remove air bubble.
6. Bake in preheated oven at 165C for 20 minutes or until cooked.
7. Remove from pan and leave to cool completely.
8. Whip whipping cream until stiff peak form.
9. Turned the cake onto a parchment paper and slowly peel of the baking paper from paper, spread evenly a layer of whipped cream.
10. Gently roll up the cake from the edge, wrap in cling wrap and refrigerate the roll  an hour until it firm and set.


Best_Recipes

I am submitting this post to Best Recipes for Everyone: BREE #10 Secret of Chiffon & Roll Cakes organised and hosted by Fion of XuanHom’s Mom


AND This post is linked to Little Thumbs Up - June'15 Event : Cream Organized by  Zoe of Bake for Happy Kids & Mui of My Little Favourite DIY Hosted by : Diana of The Dommestic Goddess Wannabe 


Friday, 12 June 2015

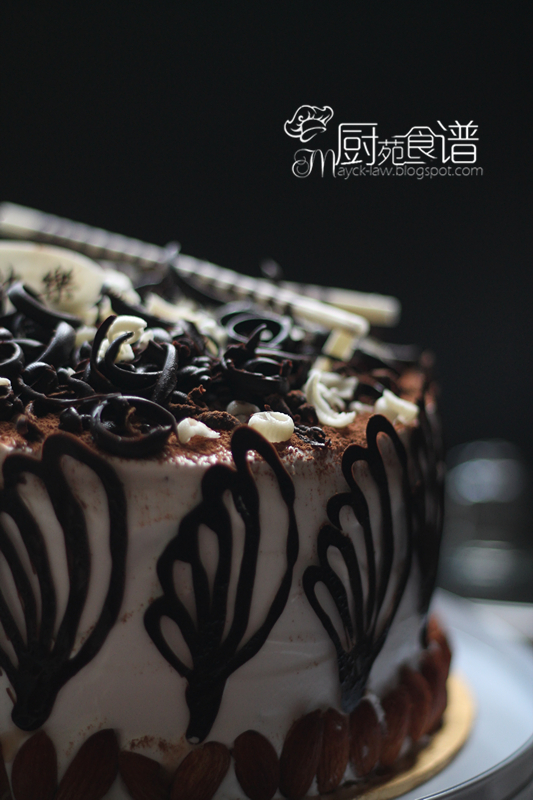
榛果巧克力冰淇淋蛋糕 (Hazelnut Chocolate Ice Cream Cake)


5月31日~ 大丫头的生日。 
其实早已盘算要为她预备的蛋糕,
听了我的大计划, 她却换画,
下订单只要冰淇淋蛋糕。
也好吧! 不必烦, 就冰淇淋蛋糕吧!
我那蛋糕大计划, 就留待下次再动手吧! 
吹过蜡烛了, 吃过蛋糕了, 
大丫头说,“ 妈妈, 改次做一整个都是冰淇淋的蛋糕,最多只是一层的蛋糕片."
原来, 嫌弃这蛋糕里有太多层的蛋糕体了,
接着她又说, 不是嫌弃, 
只是太多蛋糕体了, 吃的不过瘾!
看来下次只需买下一大桶的冰淇淋, 
然后再冰淇淋上插着几根蜡烛就得了!


谢谢远方的朋友, 千里迢迢的带来了这个美丽的蛋糕架子。  我太喜欢了, 你真知我心! 


从冰箱里取出脱模的冰淇淋蛋糕 (下图)。


【冰淇淋蛋糕,   食谱取自这里

蛋糕体材料
A)218克低筋面粉, 165克细糖,90克可可粉,1+1/2小茶匙苏打粉
1茶匙泡打粉,1/2茶匙盐

B)180克牛奶,89克粟米油,1+1/2粒鸡蛋(室温),1茶匙香精
C)172克热咖啡(165克热水+4.5克咖啡粉)

蛋糕体做法:
1.将所有材料A,混合过筛,拌均匀。
2.再将材料B的液体放入搅盘里,混合均匀。
3.将做法(2)的混合液体加入做法(1)的混合粉类中,以搅拌机搅拌至均匀。
4.然后加入热咖啡拌匀。
5.将蛋糕糊倒入7寸活动圆模里,送入烤箱里以160度烘烤45-50分钟即可。
6.放在到网架上冷却后, 切成3片, 备用。 

冰淇淋蛋糕叠合材料:
750克榛果巧克力冰淇淋
135克鲜奶油+10克糖粉 (打发)
少许巧克力滴
适量可可粉

装饰: 烤香杏仁粒, 巧克力片及黑白巧克力刨屑

做法:
1.  将冰淇淋從冰箱冷凍取出放置室溫約30-40分钟软化。
2.  将软化的冰淇淋快速度的搅拌成乳霜狀(动作要快), 分成2等份。
3.  取一片蛋糕放入7寸活动圆模里, 将一份融化的冰淇淋倒在蛋糕上, 整平。 撒上适量巧克力滴。 
4.  再取一片蛋糕平铺在冰淇淋上, 重复以上的步骤至铺完最后一片的蛋糕。 
5.  放入冰箱冷凍庫中冷凍過夜至少8-10小時至冰淇淋硬化。
6.  将冷凍完成的冰淇淋蛋糕取出脫模 (以热毛巾围绕蛋糕的周围至到冰淇淋开始脱落即可)
7.  以快速的速度在蛋糕边缘抹上打发鲜奶油(如下图), 再以筛子在蛋糕底部撒上可可粉, 然后再撒上巧克力刨屑。
8.  摆上杏仁粒及巧克片即可。 (巧克力片是做班兰千层蛋糕时所剩余的)
**装饰部分可分配进行, 否则冰淇淋会溶化。


【Hazelnut Chocolate Ice Cream Cake】

Cake base
A)218g high ratio flour, 165g castor sugar, 90g cocoa powder, 1+1/2 tsp soda powder
1 tsp baking powder, 1/2 tsp salt

B)180g fresh milk, 89g corn oil, 1+1/2 eggs (room temperature), 1 tsp vanilla essence 

C)  172g hot coffee (165g hot water+ 4.5g coffee powder)

Cake base method:
1. In a bowl, combine ingredients A and sieve it, set aside. 
2. Place ingredients B in a bowl and mix well.
3. Pour the mixed liquid (method 2) over the flour mixture (method 1), and whisk until smooth and well combined.
4.  Pour the hot coffee over the batter, whisk until smooth  and combined. 
5.  Pour the batter into 7" loose bottom round cake pan and bake in preheated oven at 160C for 45-50 minutes or until cooked. 
6.  Remove the cake from the oven, place the cake on the wire rack and leave to cool before cutting into 3 layers


{To assemble Ice Cream Cake }

750g hazelnut chocolate ice cream 
135g whipping cream + 10g icing sugar (whipped)
chocolate chips
cocoa powder

Decoration: roasted almonds, chocolate shapes and chocolate shavings

Method:
1. Line a 7" loose bottom round cake pan or springform pan with parchment paper. Place the first layer of chocolate cake in the bottom of the pan
2. Take the ice cream out of the freezer and leave at room temperature for 30-40 minutes so it can start to soften. Divide the ice cream into 2 portion.
3. Quickly beat hazelnut chocolate ice cream in a bowl until softened and immediately pour  one portion of the ice cream over the cake in pan. Spread chocolate chips onto the ice cream. 
4.  Add second layers of  chocolate cake to the pan, on top of the ice cream. Spread remaining half of the ice cream on top of the cake and spread some chocolate chips over it.
5.   Place the third layers of cake on top of the ice cream and allow ice cream cake to freeze completely for 8-10 hours or overnight.
6.  When frozen, remove from springform pan and remove parchment paper or you may use hot kitchen towel surrounding the ice cream cake pan to remove the cake pan.
7.  Quickly spread the whipped cream over the top and sides of the ice cream cake (refer to the above picture) . Spread cocoa powder on top of the frosting by using the sifter and spreading over the chocolate shavings for decoration.
8.  Put the roasted almond and chocolate shapes as deco and freeze the whole cake until serving time. 


This post is linked to Little Thumbs Up - June'15 Event : Cream Organized by  Zoe of Bake for Happy Kids & Mui of My Little Favourite DIY Hosted by : Diana of The Dommestic Goddess Wannabe 


Related Posts Plugin for WordPress, Blogger...