Thursday, 4 August 2016

牧羊人派 【Shepherd‘s Pie】


终于做了这道料理, 同时也实现了对孩子们许下的承诺。 其实, 这道牧羊人派做法简单也并非难做, 材料方面也不缺, 家里的马铃薯也多的很哟!  只是不知为何了只闻楼梯响了多年, 始终不见人下来! 这回终于不再是狼来了!


那日在机上用餐时, 看到孩子们都点了这道牧羊人派, 我即习惯又顺口的吐出了我的这句”名言“~ 回家后, 让妈妈做给你们吃!“ 

然后, 老大说”你只会说罢了!“   
老二也跟着说“你每次都这么说!”
接着,老么也看着我说“mama, 你真的说了好多次!” 
听了孩子们的真心话, 才发现原来自己经成为“吹水王”了, 嘻嘻。。。


【牧羊人派, 可供用6人

[马铃薯蓉材料]
1150克马铃薯 (屑皮切片, 蒸熟压成泥)
50克鲜奶油 
30克奶油
1茶匙半盐
适量胡椒粉

【鸡肉酱】
750克鸡胸肉(切碎)
150克大葱(切碎)
75克蒜蓉
120克红萝卜(去皮切成小颗粒)
50克灌头青豆
5粒罐头蘑菇(切碎)
2大匙香菜
350克江鱼仔高汤
适量芝士(撒面)
1大匙牛油(软化)+2大匙面粉(调匀)

【调味料】
2大匙黑胡椒粒(磨碎)
3大匙番茄酱
1大匙蚝油
1大匙有机甜豆酱
3大匙绍兴酒
3茶匙盐
1茶匙黄糖
1茶匙黑酱油
1/3鸡精块 

【做法】
1.  热3大匙油, 爆香葱碎, 加入胡萝卜炒约5分钟至软。  加入蒜蓉炒香, 下鸡肉碎翻炒均匀至鸡肉变色。  
2.  加入青豆, 蘑菇以及香菜炒至均匀。  加入调味料拌匀, 下江鱼仔高汤煮滚。  最后, 加入牛油混合物煮沸至浓稠, 试味, 离火。然后, 将肉酱倒入备好的派盘里, 备用。
3.  将马铃薯泥和其余的材料混合均匀, 铺在肉酱上, 抹平, 撒上适量芝士。
4.  送入预热烤箱以170度烘烤30-35分钟至表面金黄即可。  


【Shepherd's Pie, for 6 persons

[Mashed Potatoes Ingredients]
1150g potatoes (Peel and slice, steamed and mashed)
50g whipping cream
30g butter
1 tsp salt
a dash of pepper

【Chicken sauce】
750g chicken breast    (chopped)
150g onion (chopped)
75g chopped garlic
120g carrot (peel and cut into cubes)
50g canned green peas
5 button mushroom, canned (cut into small)
2 tbsp parsley
350g anchovies broth
1 tbsp butter (soften)+ 2 tbsp flour (mix well)
 shredded cheese

【Seasonings】
2 tbsp black pepper (grind)
3 tbsp tomato sauce
1 tbsp oyster sauce
1 tbsp organic sweet miso
3 tbsp shaoxing wine
3 tsp salt
1 tsp brown sugar
1 tsp dark soy sauce
1/3 chicken cube

【Method】
1.  Heat 3 tbsp cooking oil, saute chopped union and garlic until fragrant.  Add in carrot, stir-fry for 5 minutes.  Add chopped garlic, stir fry until fragrant and add the chopped chicken, stirring until chicken is well cooked.   
2.  Add green peas,  mushrooms and parsley, stir well.  Add seasonings, anchovies broth and bring mixture to boil.  Stir in butter mixture and bring it to boil until mixture is thickened slightly and taste.
3.  Remove from heat,  transfer the chicken mixture to baking dish.  
4.  Add butter and whipping cream into potato mixture, beat until smooth and creamy.  Season with salt and pepper, mix well.  and spread mashed potato evenly over the top。  Then,   sprinkle with
shredded cheese on top.  
5.  Bake at preheated oven at 180C for 30 minutes until golden brown.


明明是做了6人份, 我将一分半给了自己, 其余的都让孩子们给吃光光了。 看着他们吃了一份后, 又share 着吃第二份, 若非孩子们的老爸出差去了, 也许还得和孩子们争着吃呢! 我心想啊这派真的有这么好吃么?? 


不想再当“吹水王”, 警惕自己以后可别随意高喊狼来了!嘻嘻。。


Sunday, 31 July 2016

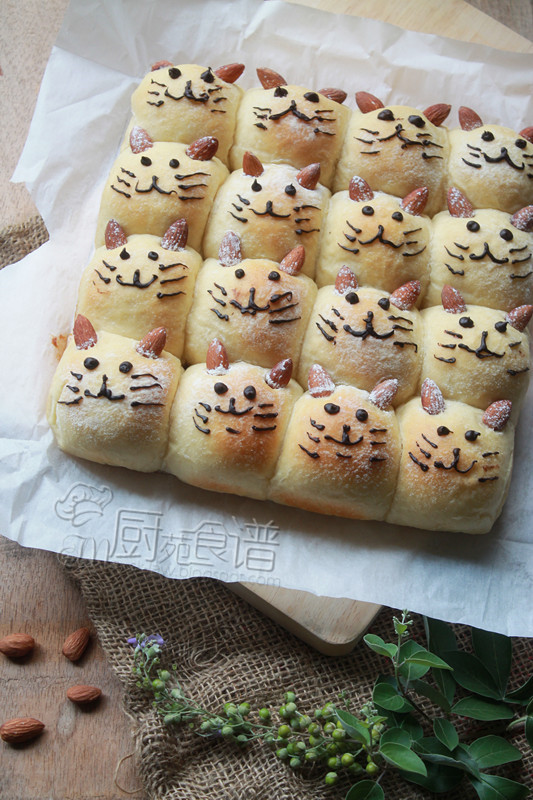
小猫挤挤椰丝面包【Kitten Buns with Coconut Filling】


这款爆红网络的挤挤小面包, 相信大家对它都非常的熟悉吧! 几个月前做的面包, 终于等到好时机把这些可爱的小猫们“释放”了。为了增加它的畅销量, 我在面包里添加了椰蓉馅,用心良苦啊! 


外表可爱的小猫, 不太适合将它装入便当里哦。  丫头说,“那些可爱的小猫经过一路的奔波劳累, 抵达校园时, 已经变成了一脸的花脸猫了, 好难看! ”  呵呵。。。


差强人意的画功, “没眼看”咯! 


【小猫挤挤椰丝面包】

[
材料]
250克高筋面粉
50克低筋面粉
40克蛋液
15克奶粉
4克即溶酵母
150克鲜奶 
35克细砂糖
3克盐
30克无盐奶油

巧克力酱:  适量巧克力,32粒杏仁 (颗粒, 烤香的)

椰丝内馅参考这里

做法
1.  将所有材料放入面包机里搅拌15分钟(除了奶油)至面团混合。
2.  然后再加入奶油, 继续搅拌至15分钟至面团顺滑混合。
3.  取出面团滚圆放入盆中以湿布盖好, 进行基础第一次发酵至双倍大(60分钟)。
4.  发酵结束后, 取出面团按压排气后,放在撒有高粉的桌面上, 平分割成16份(每个35克)小面团,滚滚圆,盖上湿布休面15分钟。
5.  然后擀成圆形, 包入椰丝内馅(也可不加), 捏紧封口, 排入烤盘里,进行第二次发酵至双倍大。(取一杯热水帮助提高温度, 让面团加速发酵。  发酵时间不是固定的, 温度不同发酵的时间长短也不一样了。)
6.  在面团上方插入一粒烤香杏仁, 并在面团的表面筛少许高筋面粉。 
7.  送入预热烤箱里以175度烘烤25分钟至表面呈现金黄色即可。
8.  取出,将面包放置铁架上放凉。
9.  将巧克力隔热水融化, 装入裱花袋里, 在前端剪一个很小的洞,在面包上画上小猫的表情即可。  

食谱参考于这里


【Cat Shape Coconut Bread

[Ingredients
]
250g bread flour
50g cake flour
40g egg (beaten)
15g milk powder
4g instant yeast 
150g fresh milk
35g castor sugar
3g salt
30g unsalted butter

Chocolate for drawing:  
adequate amount of chocolate,32 pieces of almond (roasted)

Recipe for coconut filling, please refer HERE

Method
1.  Place all the ingredients except butter) into the a bread marker, let it knead for 15 minutes until all the ingredients come together .  (First, add the wet ingredients, then followed by the dry ingredients) 
2.  When all ingredients come together, add in butter, continue kneading until the dough is smooth and elastic for 15 minutes.
3.  Cover dough with wet cloth and let it proof until doubled in size (about 60 minus).
4.  
Sprinkle some flour over the work surface, place the dough on it and press the dough to release the air.  Divide the dough into 16 portions (35g each) equally and rest for 15 minutes.  Then, shape it into ball and wrap with coconut filling.
5.  Place into greased pan to have of proofing until it's doubled in size.  
6.  Insert roasted almonds on top of the dough, and sieve with some bread flour on it.  
7.  Bake in preheated oven at 175C for 25 minutes until it golden brown . 
8.  Remove the bread buns from the baking tray and allow them to cool down completely on a wire rack.  
9.  Gently melt the chocolate over water simmering in a saucepan until melted and smooth.
10.  Then, took a pipping bag of melted chocolate and drew on the kitten's features.


Monday, 25 July 2016

开花馒头 【Flower Mantou】


没有面包机的日子,想要制作面包或包子可说是烘焙道路上一道高高的门槛。   不得不服了那个年代的人们,有双勤劳有力的双手,实在不简单啊!

之前的手揉包子后, 这是第二次以双手慢慢搓揉的包子。 这次, 还搞了双色面团,  原来我也有一双那个年代人的双手! 嘻嘻。。


 除了包子的外皮稍微有些“皱纹”,蒸出炉的包子依然是柔软的。  说也奇怪, 孩子们特爱番薯馒头, 一出炉就吃光了那7粒的圆馒头。  但是, 他们看了这几粒红花蕊的包子, 就哎哟声连连。。。幸好我聪明, 只做了6粒, 否则我又得沦落当推销员去了! 


【开花馒头】

【橙薯包皮材料, 食谱参考这里
175克橙薯泥
340克包粉
35克细糖
19克粟油
85克冷水 (视乎于薯泥的湿度)
4克即溶酵母粉
1茶匙泡打粉


【原色包皮材料, 食谱参考这里
156克包粉, 另加1大匙包粉
25克细糖
12克粟油
81克冷水
2/3茶匙即溶酵母粉
2/3茶匙泡打粉

做法
1.  将所有橙色皮材料(除了冷水)混合均匀, 然后才慢慢的加入冷水, 搓成光滑的面团。  盖上湿布放置发酵至双倍大。 (大约40分钟)
2.  将所有原色皮材料(除了冷水)混合均匀, 然后才慢慢的加入冷水, 搓成光滑的面团。  盖上湿布放置发酵至双倍大。 (大约40分钟)
3.  将橙薯面团分割(如小小记录的份量), 搓圆。  同时也将原色和红色面团分配好(如小小记录的份量),搓圆。  
4.  然后将原色面团擀成中心厚而外皮薄的圆片(每份14克的), 包入一份红色面团, 收紧封口。  
5.  再将一份橙色面团擀成中心厚而外皮薄的圆片, 包入步骤(4)的面团, 收紧封口, 封口朝下, 取利刀在面团表面上割Ⅹ。  然后, 放在蒸笼里待发约15分钟左右, 或面团变轻而按下时面团有弹性。  而剩余的面团也以同样的方式包好(只是2色, 橙色包白色) 
6.  待水滚后, 以中小火蒸约15分钟即可。 将蒸笼开个小缝, 放置2分钟后才开盖。


小小记录:
1。  橙色面团重量~650克(分2份), 一份做开花馒头, 平分成13个面团,每个25克 
而剩余的面团则做成普通圆馒头, 可做7粒(每份约46克)
2。  原色面团重量285克, 取55克面团加入数滴红色素搓至混合光滑, 平分成6份, 每个9克
而另一份则保留原色, (分成6份~ 每份14克, 以及7份,每份约20克)


Flower Man Tou

Orange sweet potato bao skin, recipe adapted from here
175g mashed orange sweet potato
340g pao flour
35g castor sugar
19g corn oil
85g cool water
4g instant yeast
1 tsp baking powder


Original bao skin , recipe adapted from here
156g pao flour, add another 1 tbsp pao flour
25g castor sugar
12g corn oil
81g cool water
2/3 instant yeast
2/3 tsp baking powder

Method
1.  Mix all the orange sweet potato skin ingredients (except cold water), gradually add in water and knead into smooth and elastic dough.  Let it rise until double in size. (40 minutes)
2.   Mix all the original skin ingredients (except cold water), gradually add in water and knead into smooth and elastic dough.  Let it rise until double in size. (40 minutes)
3.  Divide the orange sweet potato skin dough (according to the below record),  shape into a ball.  Divide the original skin dough and red skin dough accordingly to below record, shape into a ball.
4.  Then, roll the original skin dough into a thin piece (14g), wrapped in a red dough and seal up.
5.  Roll the orange skin dough into a thin piece, wrap in Step (4)  and seal up.  Take a sharp knife to cut the surface of the dough with a + mark.  Place it onto well organized steamer for fermenting 15 minutes.  Do the same for the balance of dough.
6.  Moving into boiled steamer and steam it over high heat for 15 minutes  .  Then, open the cover just a little for 2 minutes,  to let out excess steam.  

Records:-
1.  For orange sweet potato dough~650g (divide into 2 portions)
~ 1 portion to make flower mantou,  divide into 13 portions (25g each)
~ another portion to make normal round mantou, yields 7 (46g each)

2.  Original skin dough~ 285g, divide into 2 portions (55g, 230g)
~ Add a few drops of food coloring into 55g white dough, mix well and divide into 6 portions (9g each)  
~ For the balance of dough, divide into 84g and  146g accordingly.  
~ Divide 84g dough into 6 portions (14g each), and divide 146g dough into 7 portions (20g each)


开花包子开得不是很美, 开得太豪放了, 切功方面必须加为留意, 有机会再试!


Related Posts Plugin for WordPress, Blogger...