Monday 31 August 2015

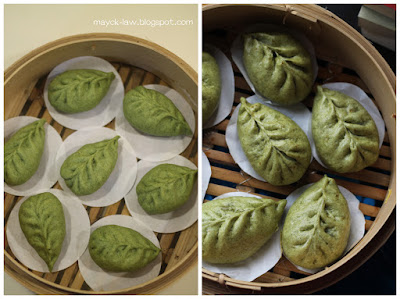
最佳食谱#12~点心 (饮茶咯!)菜粿石榴包【38】 , BREE # 12~Dim Sum,(Pomegranate Chai Kueh)


饮茶的悠闲时光, 消逝得犹如一群大雁南飞了。
一转眼间, 就是点心楼停止营业的时候了,
眼看着这茶楼即将落幕, 首先要感谢大家的捧场与支持。
从点心楼营业至今, 看着大家为这点心楼“奔波劳累”,
每日捧了一道接一道的美味点心, 由衷的感激啊!

而我这主人家, 自经营了这点心楼后,
家里真的是成了点心茶楼饮茶的所在地了。
日子固然是繁忙, 但却依然”掏心“的制作了各式的点心,
回顾这茶楼里的点心料理, 发现有好多的包子和酥饼,
没辙啦, 只能在晚饭后, 才是我制作点心的欢乐时光,
除了包子, 也只有酥饼才能承受得了漫漫长夜的”煎熬“
如此一来, 第二天的早晨,我方能顺利的拍摄。
否则错了这拍摄的黄金时光, 任我飞天遁地,
也都无法将其拍摄记录下。
打理了这点心楼后, 从中学习了不少,
从未曾做过的, 都一一的尝试了, 
从不会的, 学到会了。
这双笨拙的双手, 从学习中也变得灵活了,
感到安慰的是顺利的完成了灌汤包的褶花,以及柳叶包的褶法。


这款菜粿石榴包, 就是在忙碌的读书日里,匆忙的完成了。制作至半途, 发现缺少了腰带(青葱), 还得赶着采购腰带去呢! 然后就在急风骤雨, 朝云暮雨的情况下完成了这批暗阴阴的拍摄。 


【菜粿石榴包, 可做25个

材料
150克澄粉
50克木薯粉
225克沸水
1茶匙油

馅料
600克沙(刨丝, 稍微挤出少许水份)
60克红萝卜(刨丝)

50克黑木耳丝 (浸软)
1棵青葱(切粒)
2大匙蒜末
40克虾米(切碎)


** 数棵青葱 (用热水烫软, 作为

**适量红萝卜粒

调味料: 1茶匙盐, 1大匙蚝油, 1茶匙胡椒粉


做法
1.熱2大匙油,爆香蒜末,加入蝦米炒香。
2,加入红萝卜丝和沙葛翻炒至略干,然后加入调味料炒匀,试味,盛起备用。
3。将澄粉和薯粉混合在搅拌盘里,即刻将沸水一次过的倒入,快速的以筷子搅拌成软团。
4,加入1茶匙油,用手揉成光滑麵團。
5.將麵團擀成圓薄片,再以切模壓出,包入餡料,褶成石榴包菜粿,用青蔥梗紮緊在頂部撒上少許紅蘿蔔細粒。
6.將石榴包菜粿擺入塗上油的蒸盤上,以大火蒸8分鐘即可,趁熱食用。


温馨提示: 做这石榴皮时, 尽量将水煲至沸滚, 煲越久越好(滚多5-8分钟)。然后才将沸水倒入澄粉盘里(要一次过的倒入)。这样冷却后的粿皮就不易变硬,粿皮会有弹性,也不容易破裂。

食谱依然参考了这里


Pomegranate Chai Kueh, makes 25
Ingredients:
150g wheat starch
50g tapioca flour
225g boiling water
1 tsp cooking oil

Filling:

600g sweet turnip (peeled, shredded)
60g carrot (peeled, shredded)
50g shredded black fungus
1 stalk of spring onion (cut into small cubes)
2 tbsp chopped garlic
40g dried shrimps (soaked, chopped)
** spring onion (soaked with hot water, use as a rope)
** chopped carrot 
Seasoning: 1 tsp salt, 1 tbsp oyster sauce, 1 tsp pepper

Method:

1. Heat 2 tbsp cooking oil , sauté garlic over low heat until fragrant. Add in dried shrimps and mix well.
2. Add carrot, sweet turnip and seasoning, toss until aromatic and dry. Taste and dish out.
3. In a mixing bowl, combine wheat starch with tapioca flour, Pour in boiling water and mix well by using the chopstick.
4. Add 1 tsp oil and knead into a pliable smooth dough.
5. Roll the dough into a flat and thin sheet, then cut out by using the cutter.  Spoon in 1 portion of the filling in the center, pull up the edges of the pastry around the filling to make a cylinder to resemble as pomegranate dumplings and tie up with spring onion. Garnish with chopped carrot on top.
6. Place the dumplings on a greased steaming tray, steam over hot boiling water for 8 minutes over high heat until it cooked. Dish out and serve hot.

TipsWhen making this pomegranate skin, you have to keep the water boiled, if possible just let it boiled for extra 5-8 minutes.  Then,  pour the boiled water in once , this will keep the skin elastic and not easily broken.  


此刻, 忽然有点不舍得这点心楼了,嘻嘻!


This post is linked to the Best Recipes for Everyone August 2015 Event (Theme: Dim Sum)  organised by Fion XuanHom's Mum Kitchen Diary) and hosted by May (厨苑食谱 @ mayck-law.blogspot.com).


最佳食谱#12~点心 (饮茶咯!)迷你班兰蛋挞 【37】(BREE # 12~Dim Sum, Mini Pandan Egg Tarts)


在报纸上看到一篇文章的标题写着, 时间都去那儿了?
我楞着了, 是的,  我的时间都跑哪儿去了呢?
任我如何的追逐着, 总是赶不上那时间的流逝, 
当那壁钟, 每60分钟响起那灿烂的声响时,
我的心也随着那声响跳着, 不知觉中动作也变得迅速了。 
总是听人说, 人生就是马拉松, 慢慢来吧! 
怎么慢慢来法啊, 快快的来都无法赶完该做的事, 
这慢慢来的话, 这生活岂不是乱了脚步, 乱了方针吗? 
友人们听了都感惊讶, 没上班的师奶,有什么可忙的?
师奶该忙的事务可多的是,仅仅是那烦人晚餐都够忙够烦了,
总是情迷被困在“鱼虾蟹” 之间, 那句今晚煮什么啊,
从此就成了师奶煮妇们的名言了!


这挞子, 就因忙碌而结下的情缘。 因时间不够用, 而无法在当日拍摄。 第二日才设法将这挞子留照, 只是这挞子实在不堪“熬夜” , 它犹如遇着了强烈的地震般地陷了。

然而, 依然将这好吃的挞子留下了记录, 可却让它排了好长的队伍! 


迷你班兰蛋挞,食谱参考Victoria Bakes 和 Mui Mui

挞皮材料:
125克无盐奶油
1/2 粒鸡蛋
1大匙細糖
200面粉

内馅材料:
50克細糖
75克热水
125克椰浆
2小匙浓缩班兰汁
1/8小匙盐
1/4小匙香草精
2粒鸡蛋

做法:
1. 将奶油和細糖以打蛋器搅打至混合, 加入鸡蛋,搅拌均匀。
2.  加入面粉混合, 以手指搓揉成团, 静置30分钟。 
3.  取一小份面团轻轻按入挞模里, 紧压至贴合, 修边。(或者也可将面团擀成4mm的厚度, 以切模切出面皮, 然后再挤压在挞模里。)
4. 将压好挞皮的挞模,放入冰箱里冷藏至少2小时至硬化。  

制作内馅  
1. 将細糖加入热水里, 煮至溶解, 冷却备用。 
2.   将蛋液以搅拌器打散, 再将其余的液体混合, 然后加入糖水倒入蛋液中, 过滤3次。 
3. 把班兰蛋液倒入冷藏的挞皮里, 送入预热烤箱以165度烘烤18分钟至熟。 


Mini Pandan Egg Tarts, Recipe from Victoria Bakes and Mui Mui 

Pastry ingredients
125g unsalted butter
1/2g egg
1 tbsp castor sugar
200g all purpose flour

Filling
50g castor sugar
75g hot water
125g coconut milk
2 tsp pandan juice
1/8 tsp salt
1/4 tsp vanilla essence
2 eggs

Method
1.  To make pastry: Combine butter and sugar in a large bowl and stir until evenly incorporated. Add in egg and whisk for 30 seconds.
2.   Add the flour, use your fingertips work with all the ingredients  and form into a ball of dough. Wrap with cling film and chill in the refrigerator for about 30 minutes. 
3.  Remove the dough,  take a small portion of the dough and gently press the dough into the bottom and up the sides of the tart shell. (Or you may roll out dough into 4mm thick and cut with a round pastry cutter. place dough disk into egg tart shell and press lightly to fit into the egg tart tin. )
4. Chill the lined tart shell for at least 2 hours or overnight till firm.

To prepare filling:
1.  Combine sugar and hot water, mix until sugar completely dissolved.  .
2.  Whisk eggs with coconut milk, pandan juice, salt and vanilla essence together and then thoroughly whisk in the sugar syrup, mix well. 
3.  Sift egg mixture 3 times and carefully pour egg mixture into each tart shell. 
4.  Bake in preheated oven at 165C for 18 minutes until golden brown. 


This post is linked to the Best Recipes for Everyone August 2015 Event (Theme: Dim Sum)  organised by Fion XuanHom's Mum Kitchen Diary) and hosted by May (厨苑食谱 @ mayck-law.blogspot.com).


Jom! Let's go yum cha!


Sunday 30 August 2015

最佳食谱#12~点心 (饮茶咯!)菠菜沙葛包【36】(BREE # 12~Dim Sum, Spinach Turnip Pao)


一心只想做南瓜包子,备好了从Cass那偷师而来的沙葛内馅。
计划好在晚饭后, 就即刻动手搓面团了。
鬼迷心窍的我, 忽然猛想起那尚未开张的菠菜粉,
忽然又想到, 将菠菜包配上沙葛馅,
两者皆是同类, 应该会是“最佳拍档”吧!
于是, "临时临急的奔向厨房, 炒了一道咖喱鸡内馅,
再来了一招‘狸猫换太子 南瓜包子的沙葛馅给换了!
这就是菠菜包子出现于此的来龙去脉, 
以及厨苑里翻版式的狸猫换太子的故事了! 
撩人的夜晚, 就这样被南瓜与菠菜包子给抹杀了!
呵呵。。。


没有鲜艳的菠菜色,  我还是喜欢蒸前的包子!


【菠菜沙葛包, 可做12

皮料:
250克包粉
2+1/2茶匙菠菜粉
少许盐
1小匙即溶干酵母
40克細糖
130克清水
15克白油

** 1/2 
大匙泡打粉

内馅
480克沙葛丝
60克胡萝卜丝
40克黑木耳丝
20克虾米 (浸软, 洗净)
大匙蒜末

调味料:  1茶匙半盐, 1/2茶匙花椒粉, 1茶匙耗油

做法
1. 2大匙热油, 爆香蒜末, 加入虾米炒香。 
2. 加入红萝卜丝和黑木耳丝翻炒片刻, 然后加入沙葛丝炒至软。 加入所有的调味料翻炒均匀,  试味盛起, 待冷备用。
3.   将所有皮料(除却泡打粉)混合均匀搓成光滑的面团,盖上湿布休面让它发酵至双倍大。
4.   加入泡打粉, 充分将其混合柔至均匀, 盖上湿布松弛20分钟。
5. 再度轻柔面团, 分割成12份, 搓圆擀成中心厚, 外围薄的圆片,舀入一大匙餡料(我用冰淇淋勺子), 褶成叶子形的包子, 收口。 
6.  放在蒸盘上, 待发15分钟至按下面团有弹性。

7.  待水滚后,放入蒸笼里,以大火蒸约15分钟即可。 放置分钟后才开盖。  


Spinach Turnip Bunmakes 12

Skin ingredients 
250g pau flour
2+1/2 tsp spinach powder
a pinch of salt
1 tsp instant yeast
40g sugar
130g water
15g shortening

** 1/2 tbsp baking powder

Filling
 
480g mengkuang/ sweet turnip (peeled, shredded )
60g carrot (peeled, shredded) 
40g black fungus (shredded)
20g dried shrimp (soaked and chopped)
1 tbsp chopped garlic

Seasoning: 1 tsp salt, 1/2 tsp pepper, 1 tsp oyster sauce

Method
1.  Heat 2 tbsp of cooking oil, saute garlic over medium heat until fragrant,  add dried shrimps and stir well.
2.  Add carrot and black fungus stir well, then add in sweet turnip toss and seasoning, toss until aromatic and dry, taste and dish out. 
3.  Mix all the skin ingredients (except the baking powder), knead into a smooth and elastic dough. 
4.  Add baking powder and knead evenly, rest for 20 minutes.
5.  To knead the dough again, and divide the dough into 12 portions.  To shaft a round shape and wrap in filling 1 ice cream scoop),  seal up.
6.  Place it onto well organized steamer for fermenting 15 minutes.
7.  Moving into boiled steamer and steam it for 15 minutes, and let it stay for 1 minutes before open the steamer. 


This post is linked to the Best Recipes for Everyone August 2015 Event (Theme: Dim Sum)  organised by Fion XuanHom's Mum Kitchen Diary) and hosted by May (厨苑食谱 @ mayck-law.blogspot.com).


Jom! Let's go yum cha!

最佳食谱#12~点心 (饮茶咯!) 咸水角 【35】(BREE # 12~ Dim Sum, Crispy Glutinous Puff with Chicken Filling)


咸水角是广东常见的点心,主要的馅料里含有猪肉, 虾米, 冬菇, 以及沙葛。 而皮料的制作则以沸水冲入澄粉里, 搓均后再加入糯米粉以及其它的材料中均匀。  裹好馅料后, 再放入热油里炸至淺金黃色即可。 

炸功失败了,无法炸出外皮带有“泡泡”的咸水角。 然而, 味道却十分美味, 又懒得重做。 只好厚着脸, 让它悄然的躲在角落的一角吧! 


【咸水角】

皮料
150克糯米粉, 38克澄粉, 55克細糖, 20克白油, 1/4杯沸水, 1/2杯冷水

馅料
90克鸡肉, 20克虾米, 2朵冬菇 (16克), 70克沙葛, 1大匙蒜末, 1棵青葱

调味料:
1 茶匙耗油, 1 茶匙盐, 1 茶匙糖, 少许胡椒粉, 1/2茶匙麻油
1茶匙半粟粉+2大匙清水

做法
1. 热2大匙热油, 爆香蒜末, 加入虾米至香浓。 加入鸡肉和冬菇翻炒片刻, 最后加入沙葛翻炒至均匀。
2.  加入调味料炒匀, 试味, 盛起待冷。
3.  将澄粉放置盆里, 冲入沸水, 快速的搅拌拌匀。
4.  将糯米粉放置另一盆中, 加入糖, 白油以及冷水搅拌均匀。
5.  然后加入步骤3的澄粉团搓至光滑的软团, 分成8份, 逐一的包入适量的馅料, 捏成橄榄形。
6.  放入热油中以中火炸至浅金黄, 捞起沥干油份, 即可。


【Crispy Glutinous Puff with Chicken Filling】

Skin ingredients
150g glutinous flour
38g wheat starch
55g castor sugar
20g shortening
1/4 cup boiling water
1/2 cup cool water

Filling
90g chicken meat, diced
20g dried shrimp (soaked and diced)
2 dried mushrooms (soaked and diced)
70g sweet turnip
1 tbsp chopped garlic
1 stalk of spring onion

Method
1. Heat 2 tbsp cooking oil, saute chopped garlic until fragrant.  Add dried shrimp, chicken meat and mushrooms stir fry until aromatic.   Then, add sweet turnip and mix well.
2.  Add seasoning,  stir well.  Taste and dish up.
3.  Place wheat starch in a mixing bowl,  pour in boiling water and mix well
4.  Place glutinous rice in another mixing bowl, add sugar, shortening and pour in cool water, mix well.
5.  Combine steps 3 and steps 4 together and mix well, knead into a smooth and pliable dough. Divide into 8 portions, shape into a balls, flatten, roll into a round piece and wrap in filling.
6.  Heat up oil for deep-frying, deep-fry puffs until light golden brown, dish and serve.


This post is linked to the Best Recipes for Everyone August 2015 Event (Theme: Dim Sum)  organised by Fion XuanHom's Mum Kitchen Diary) and hosted by May (厨苑食谱 @ mayck-law.blogspot.com).


Jom! Let's go yum cha! 


最佳食谱#12~点心 (饮茶咯!)鲜奶椰汁红豆糕【34】(BREE# 12~ Dim Sum, Coconut Milk with Red Bean Pudding)


又是每日一点心的时刻了, 哈哈。。


犹豫了好久才决定做的甜品, 即没做过也未曾品尝过。 犹豫不决的迟迟未敢动手,只因为甜品里的加入了打发蛋白。  只要想到那尚未煮熟的蛋白, 我不禁有些抗拒, 总是感觉怪怪的。 但是, 若不动手做了它, 心有千千结啊!

难以解开对这道甜品的疑惑,更为了能解开心中的结。 最后, 还是动手做了, 为了让这道甜品增添色彩, 我在食谱里加了一些煮熟的红豆!  


说真的, 起初我还不敢品尝这道甜品, 只是从家人的嘴里得知了它的味道和口味。   直到第二日, 始终还是忍不住的试了一个, 感觉很像果冻, 相较我还是喜欢果冻的口味!


鲜奶椰汁红豆糕

材料
60克煮熟红豆
1粒蛋白, 加入1 茶匙细糖打发至硬
150克椰奶
65克鲜奶

125克清水
45克细糖
20克黄糖
1大匙鱼胶粉
1/2大匙燕菜粉
2片香兰叶 (打结)

做法
1.  把鱼胶粉, 燕菜粉, 香兰叶以及细糖加入锅中, 注入清水以小火煮至溶解。
2.  加入鲜奶和椰奶煮至滚, 即刻倒入打发的蛋白, 边搅边倒入至均匀。待冷备用。
3.  然后,把椰奶糕液倒入铺有红豆的模子里,放入冰箱里冷藏至凝固后享用。

** 加入了20克的黄糖, 只为了参与小拇指的活动.

食谱参与Agnes Chang 做点心


Coconut Milk with Red Bean Pudding

Ingredients
60g red bean (cooked until tender)
1 egg white, add 1 tsp sugar, whisked until stiff
150g coconut milk
65g fresh milk

125 g water
45g castor sugar
20g brown sugar
1 tbsp gelatine powder
1/2 tbsp agar agar powder
2 pieces pandan leaves

Method
1.  Add gelatine powder, agar-agar powder, pandan leaves and sugar in a pot.  Add water and bring it to boil until sugar and gelatine powder both have dissolved.
2.  Add fresh milk and coconut milk , bring it to boil and immediately pour in the stiff egg white, whisking mixture while pouring it. set a side.
3.  Then, pour the batter into the cake mould which covered with red bean, refrigerate until set or cold, serve.


This post is linked to the Best Recipes for Everyone August 2015 Event (Theme: Dim Sum)  organised by Fion XuanHom's Mum Kitchen Diary) and hosted by May (厨苑食谱 @ mayck-law.blogspot.com).


littlethumbups1-1


This post is linked to the event Little Thumbs Up (August 2015 : Brown Sugar and Molasses) organised by Zoe of Bake for Happy Kids and Doreen of My Little Favourite DIY, and hosted by Jess from Bakericious.

Related Posts Plugin for WordPress, Blogger...