Thursday 31 March 2016

脆烤蒜香鸡腿【Garlic Roasted Chicken Leg】


家里的厨房里, 几乎少不了蒜, 也离不开蒜。 就以这份与蒜具有的亲密关系, 不管是用它来拌菜或是清蒸, 也不管是蒜泥, 蒜片还是蒜米都各有各的用项, 皆不可缺少。

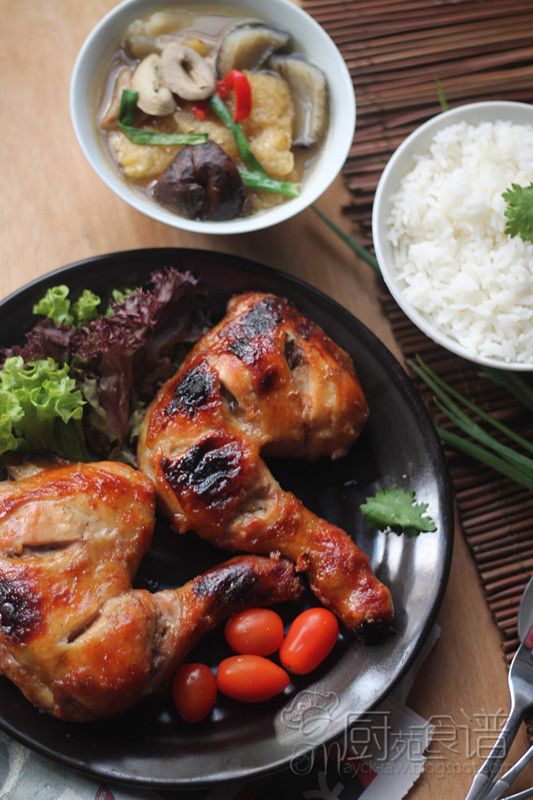
总而言之, 餐桌上顿顿少不了蒜的陪衬, 无论是在家里或是外面用餐, 都喜欢将蒜拌着辣椒挑着食物吃。  在这道烤鸡中, 蒜扮演了主台戏, 带来了我意想不到的惊喜。  鸡肉也因为蒜的提味, 增鲜, 变得活色生香,蒜香味浓了!


蒜可说是人间之宝, 跟谁都合得来, 和谁都是知己。 鱼肉也好, 鸡肉也罢,任何一样菜肴缺了蒜就倒台了。 蒜的那种辛辣, 刺激的味道, 吃起来让人难忘。


脆烤蒜香鸡腿】
3只鸡腿
适量白芝麻(撒面)

[酱汁]
5大匙蒜末, 7大匙酱油, 6茶匙黄糖, 3大匙蜂糖

做法
1.  将鸡腿洗净, 然后再鸡肉上割两刀备用。
2.  将所有酱汁拌匀, 涂抹在鸡腿上腌制至少6小时或隔夜。
3.  取出, 放入预热烤箱以180度烘烤40分钟, 撒上白芝麻即可。 (途中取出翻面,涂抹上剩余的酱汁)


【Garlic Roased Chicken Leg】

[Ingredients]
3 whole chicken leg
** white sesame seeds for sprinkle

[Marinade]
5 tbsp minced garlic, 7 tbsp soy sauce, 6 tsp brown sugar, 3 tbsp honey

Method
1.  Wash chicken and pat dry..  Cut two scores across it.
2.  Mix all the marinade ingredient, rub chicken with marinade for at leave 6 hours or overnight.
3.  Place it in pre-heated oven and roast it at 180C for 40 minutes.  Then, garnish with sesame seeds and serve.  (Brush chicken with dripping while roasting)


This post is linked to the event Bake Along #93 (Baked/Roasted Chicken) organised by Zoe (Bake for Happy Kids), Joyce (Kitchen Flavours) and Lena (Frozen Wings).


 This post is linked to the event Little Thumbs Up (March 2015 Event: Honeyorganized by Zoe (Bake for Happy Kids) and Doreen (My Little Favourite DIY) and hosted by Joyce (joycescapade.com).

Wednesday 30 March 2016

一口蒜香乳酪面包【Mini Garlic Cheese Bread】


近来, 我对蒜情有独钟。  不论是在烹饪或是烘焙, 都喜欢加入蒜作为佐料, 即可提鲜又可提味, 就是喜欢它的那股蒜香味。所以, 今天的这款面包, 我也分不清这主角该是乳酪还是蒜奶油了。当那阵阵的蒜香味从烤箱里飘散时, 我不禁贪婪的吸了几口气, 只想沉浸于甘甜的面包香和浓郁的蒜香味中。只能说啊,原来面粉和蒜也是故交呢! 


                            虽说是一口面包, 但我的他却反驳着“谁说是一口, 我要两口的!” 


【一口蒜香乳酪面包

[材料]
200克面包粉/高筋面包
1/3茶匙即溶酵母
30克细糖
1粒鸡蛋(除壳55克)
1大匙Parmesan Cheese
80克鲜奶
1/8茶匙盐
30克无盐奶油

表面  适量蒜香奶油(市场购买的, 原者没放)

做法
 1.  将所有材料放入面包机里搅拌15分钟(除了奶油)至面团混合。
2.  然后再加入奶油, 继续搅拌至15分钟至面团顺滑混合。
3.  取出面团滚圆放入盆中以湿布盖好, 进行基础第一次发酵至双倍大(60分钟)。
4.  取出,将面团放在撒有高粉的桌面上, 以手掌紧压并将空气排出,将面团滚圆, 盖上湿布休面15分钟。
5.  然后将面团以擀面棍压成一块厚度1cm的方形面皮。
6.  涂抹一些高粉在锋利刀锋上, 将面皮切成约2cm x 2 cm的小方块再将面团排入烤盘里,(稍微离隔一些距离)
7.  取适量蒜香奶油, 放置在分割好的面团上,放入烤箱里进行第二次发酵30分钟(取一杯热水帮助提高温度, 让面团加速发酵。)
8.  提早10分钟将烤盘取出, 将烤箱预热175度至10分钟。
9.  放入烤盘, 烘烤17分钟至表面呈现金黄色即可取出,将面包放置铁架上放凉。

食谱参考Carol 自在生活


【Mini Garlic Cheese Bread

[Ingredients]
200g bread flour
1/3 instant yeast
30g castor sugar
1 egg(without shell, 55g)
1tbsp Parmesan Cheese
80g fresh milk
1/8 tsp salt
30g unsalted butter

Topping:  garlic butter (Optional)


Method
 1.  Place all the ingredients except butter) into the a bread marker, let it knead for 15 minutes until all the ingredients come together .  (First, add the wet ingredients, then followed by the dry ingredients) 
2.  When all ingredients come together, add in butter, continue kneading until the dough is smooth and elastic for 15 minutes.
3.  Cover dough with wet cloth and let it proof until doubled in size (about 60 minus).  
4.  Sprinkle some flour over the work surface, place the dough on it and press the dough to release the air and rest for 15 minutes.  
5. Flatten it and roll it with rolling pin into a flat and square sheet, with thickness of 1cm.  
6.  Using a sharp, dipped the knife blade with some bread flour, cut into small cubes into 2cm x 2cm small cubes. 
7.  Arrange it into baking tray with some distance and spray some water on it.  Put it into oven without any temperature and let it proof until doubled in size.  (about 40 minutes, you may  place a cup of hot water to raise the temperature )
8.  Remove from oven, place some garlic butter on  top of the dough and bake in preheated oven at 175C for 15-17 minutes until the top is slightly golden brown.


Monday 28 March 2016

蜜汁烤鸡腿【Baked Honey Chicken Leg】


又见烤鸡!是的, 餐桌上逢餐必有鸡,3个孩子中只有小丫头吃鱼吃虾, 这也是我最为头痛的事。我的他却不怎么喜欢啃鸡肉, 最爱的也离不开海鲜二字。   每次步入厨房打开冰箱时, 我左右为难,取鸡也不是取鱼也不是, 很烦!  家里只有五张嘴等着开饭, 却是各有各的喜欢。 唉! 难也! 


这次尝试了杨桃的蜜汁烤鸡制作方式, 也蛮不错的, 起码封住了那几张嘴!   


蜜汁烤鸡腿


[材料]
3只全鸡腿
[腌料]
1大匙蒜末, 1茶匙黑胡椒粉, 2大匙绍兴酒, 2/4茶匙盐, 2茶匙黄糖
[酱料]
2大匙蜂蜜, 1大匙黄糖, 3大匙番茄酱, 1/4茶匙盐, 2茶匙蒜末, 1大匙姜泥, 2大匙柠檬汁

做法
1.  将鸡腿洗净, 然后再鸡肉上割两刀备用。
2.  将所有腌料拌匀, 涂抹在鸡腿上腌制至少6小时或隔夜。
3.  把酱料拌匀, 即成蜜汁酱备用。
4.  从冰箱里取出腌制的鸡腿, 放入预热烤箱以190度烘烤15分钟, 取出涂抹蜜汁酱, 再放回烤箱烤10分钟, 再取出涂抹蜜汁酱, 重返回烤箱继续烤10分钟即可。


Baked Honey Chicken Leg

[Ingredients]
3 whole chicken legs
[Marinade]
1 tbsp minced garlic, 1 tsp black pepper powder, 2 tbsp shaoxing wine
2/4 tsp salt, 2 tsp brown sugar
[sauce]
2 tbsp honey, 1 tbsp brown sugar, 3 tbsp tomato sauce, 1/4 tsp salt
2 tsp minced garlic, 1 tbsp minced ginger, 2 tbsp lemon juice

Method
1.  Wash chicken and pat dry.  Cut two scores across it.
2.  Mix all the marinade ingredient, rub chicken with marinade for at leave 6 hours or overnight.
3.  Combine all the sauce ingredients, mix well.
4.  Take out the chicken from the fridge, arrange chicken legs on wire rack with foil-lined tray beneath and place it in preheated oven and roast it at 190C for 10 minutes.  Remove tray from oven, brush with honey sauce and bake for another 15 minutes.  Then, repeat the same step and continue bake for another 10 minutes or until golden brown.


存库里有好多的烤鸡, 尽量努力的贴了它!


烤鸡,再配一煲的海参鱼鳔汤,各得其爱!  


This post is linked to the event Bake Along #93 (Baked/Roasted Chicken) organised by Zoe (Bake for Happy Kids), Joyce (Kitchen Flavours) and Lena (Frozen Wings).


 This post is linked to the event Little Thumbs Up (March 2015 Event: Honeyorganized by Zoe (Bake for Happy Kids) and Doreen (My Little Favourite DIY) and hosted by Joyce (joycescapade.com).


    Sunday 27 March 2016

    瓦煲芋头糙米饭【Clay Pot Taro with Brown Rice】


    记得第一次帮老爸煮糙米饭时, 老爸担心我会将糙米饭煲得“硬板板‘的, 所以不断叮咛的说”要加多水份, 要煲得比白米久, 否则会熟不透!“ 老爸的这番话, 我牢牢紧记了。 

    若干年后, 终于也为自己煮了第一煲的糙米饭, 这一餐让我吃得不安宁。餐桌上, 他哓哓不休的念着“哎呀! 怎么煮的, 加太多水了!”

    "是吗? 老爸说过要加多水,而我已经稍微减低水份了, 听爸爸的话不是吗?。“ 我回答。
    ”哎呀呀! 听妈妈的话。。。, 谁叫你爸爸的话!” 他竟然要哼起歌儿了。


    时常听人家说吃糙米比吃白米好, 然而很多人依然还是不习惯糙米那粗糙的口感。  为了让那几个瓜也习惯糙米的口感, 刚开始都是以一半糙米, 一半白米混合, 慢慢的调整比例。 后来, 抵不过他们的这句”我们可以吃白米饭吗?“ 最后, 孩子们有孩子们的白米饭, 而糙米饭就让俩老去挨吧!
    几乎与白米绝缘的我, 接到"芋头饭”的旨意时, 心里就争扎着。 心想, 不知是否能以糙米来煮这道芋头饭? 其实, 习惯了食用糙米的人,一定也会发现糙米独特的口感和嚼劲。


    手里捧着一碗晶透的糙米芋头饭, 此刻他的嘴里不再唠唠叨叨的念念碎了!


    【瓦煲芋头糙米饭, 共3人食用
    [材料]
    150克糙米+少量紫米(适量)
    160克清水

    160克芋头(削米, 切丁)
    50克鸡丝(加入适量盐,胡椒粉以及1茶匙绍兴酒, 腌制15分钟)
    15克虾米(浸泡水中5分钟, 沥干)
    2 朵香菇(浸泡, 切片)
    100克清水
    2小碗沸水(150-160克)
    适量香菜

    [调味料]
    1/2茶匙盐, 1/2茶匙五香粉, 1/2茶匙花椒粉,1茶匙麻油, 2大匙瑶柱汁/蚝油

    【做法】
    1.  将糙米以清水洗净,浸泡10分钟。
    2.  将糙米放入电饭锅中, 加入清水煮熟即可。(这里的水份微少, 所以此时的糙米只有8分熟, 而米芯还尚未熟透
    3.  烧热1大匙油, 爆香虾米, 芋头, 香菇片和鸡肉丝,加入煮熟糙米饭,100克清水和调味料炒至香浓 。
    4.  将炒好的步骤(3)材料, 转移至瓦煲中, 注入沸水盖上, 利用锅内的余温继续加热并以慢火焖至水分微干至熟即可.  (大约15-20分钟,如觉得太干, 亦可添加适量热水)
    5.  开盖后, 先将米饭翻松, 让软硬度均匀。 


    (8分熟的糙米)


     【Clay Pot Taro with Brown Rice, for 3 persons

    [Ingredients]
    150g brown rice + purple/black rice(a few)
    160g water

    160g taro (peel and cut into cubes)
    50g chicken breast, shredded (marinate 15 mins with adequate of salt, pepper and 1 tsp shaoxing wine)
    15g dried shrimps (soak for 5 minutes and drain)
    2 chinese mushrooms (soak in the water, sliced)
    100g water
    2 small bowl of hot water (150-160g)
    adequate of clitra

    [Seasoning]
    1/2 tsp salt, 1/2 tsp five spices powder, 1/2 pepper, 1 tsp sesame oil, 2 tbsp scallop/oyster sauce

    【Method】
    1.  Wash brown rice and soak with water for 10 minutes.
    2.  Place brown rice in an electric rice cooker, add in water cook until rice is done. (There is lesser amount of water, so only 80% of the brown rice is cooked))
    3.  Heat up 1 tbsp oil, saute dried shrimps, taro, mushrooms and shredded chicken until fragrant.  Add in rice, 100g water and seasoning, stir-fry until aromatic.  
    4.  Transfer the mixture (step 3)into a clay pot, add boiling water.  Cover and cook with low heat for about 10 minutes until water is fully absorbed or the rice is cooked through.  Dish up, serve hot. 


    Q弹好吃的芋头糙米饭,俩老的晚餐, 有多了一份, 你要吗? 


    Related Posts Plugin for WordPress, Blogger...