

十指不沾阳春水的她,
竟然斗胆向其好友下了战书。
抛下那笨重的书包后,即担忧又兴奋的她,
立即奔向厨房而来,
一连串的发问了许多有关制作乳酪蛋糕的疑问。
这场与好友之间友情之战,
也改变了她对烘焙的兴趣。
她,
念念不忘这款能征服所有人的乳酪蛋糕,
只是找不到好时机,将它逮下收纳在我的镜头底下。
看着这丫头,
将一切的材料就绪后,
就谨慎的开始了她的蛋糕制作过程。
将蛋糕送入烤箱后,
屡次的徘徊在烤箱旁,
一边瞪着烤箱,
一边说着“妈咪,
这是个不会失败的食谱吧?
或许是个侥幸, 更或许是她幸运吧!
蛋糕成功的征服了所有的”评判者“,
也让她兴奋极了,
呶呶不休的说,
“这蛋糕除了不会失败,
果然还能征服所有的人呢?”

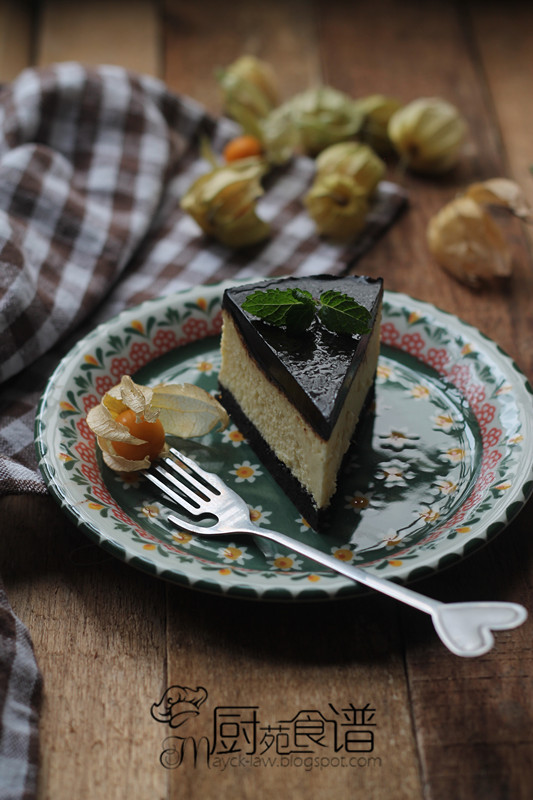

【巧克力乳酪蛋糕, 一个6寸活底模】
[奥里奥饼干底]
110克奥利奥饼碎, 奥50克奶油(融化)
[乳酪蛋糕层]
250克乳酪奶油 (温室软化), 2粒鸡蛋, 50克细糖, 60克动物性鲜奶油
[巧克力表层]
70克黑巧克力, 60克动物性鲜奶油, 10克奶油
[做法]
1. 首先将6寸活底模子, 裹上一层锡纸, 备用。
2. 将奥利奥饼干放入一个塑胶袋, 以擀面杖将饼干压成碎状。
3. 加入融化奶油, 搅拌均匀。 倒入6寸圆模里, 均匀的铺在模型底部, 压紧, 放入冰箱里冷藏备用。
4. 把细糖加入软化乳酪奶油里, 以搅拌机搅打至顺滑状。
5. 酱鸡蛋逐粒的加入,至鸡蛋充份被搅拌后再加入另一粒。 然后, 加入动物性鲜奶油, 即成乳酪蛋糕糊。
6. 将搅拌均匀的乳酪蛋糕糊, 倒入步骤2的冷藏奥利奥饼干模里。
7. 将步骤6的蛋糕模子放入一个装有水的烤盘里 (水的份量要高过蛋糕糊高的 1/3以上)。
8. 送入预热烤箱170度, 烘烤1小时或至熟。蛋糕出炉后, 无需脱模。
9. 在等待蛋糕冷却时, 将黑巧克力切碎, 奶油切成块。 然后倒入鲜奶油, 隔水加热并不断搅拌至巧克力完全融化。
10. 将温热的的巧克力酱倒入乳酪蛋糕上, 静待几分钟至巧克力酱变得平整。
11. 将蛋糕模放入冰箱里, 冷藏4个小时以上。 取出, 脱模即可享用。 (脱模时, 以小刀沿着蛋糕模壁划上一圈, 或是用热毛巾围绕着蛋糕模)

【Chocolate Cheese Cake】
[Oreo Cookies base]
110g oreo small crushed cookie pieces, 50g unsalted butter (melted)
[Cream Cheese Layer]
250g cream cheese (soften), 2 eggs
50g castor sugar, 60g whipping cream
50g castor sugar, 60g whipping cream
[Chocolate layer]
70g dark chocolate , 60g whipping cream, 10g butter
[Method]
1. Place the spring form or loose bottom pan on aluminium foil, gently fold up the sides of the foil around the pan and press the foil around the edges of the pan. (repeat to fold up with 2 layers to avoid the water leaks into it while baking)
2. Place oreo small crushed cookies in resealable plastic bag and finely crush the cookies pieces by rolling pin across the bag.
3. Place it in bowl, add melted butter and mix well. Press firmly onto bottom of 6-inch loose bottom pan and place the pan in the fridge for later use.
4. Cream cream cheese and sugar till creamy and smooth.
5. Add in egg, beat well after each addition of egg until creamy. Add in whipping cream and mix until incorporated.
6. Pour the cream cheese mixture over prepared crust and spread evenly.
7. Place the foil-wrapped loose bottom pan in a large pan and pour the water into the large pan (water level = about 1/3 inches of the loose bottom pan)
8. Bake in preheated oven for 170C for 1 hour until cooked. Remove the pan from the oven and let it cool aside. (do not unmould it)
9. While waiting the cake to cool, chopped the dark chocolate and butter. Place it in a bowl that can be placed over a small saucepan of simmering water. Then, add in whipping cream, gently melt the chocolate over water simmering in a saucepan until melted and smooth.
10. Take the cheesecake out from the fridge and pour the warm chocolate mixture across the top of the cake. Let it cool for a minutes until the chocolate mixture spread evenly. Place the cake pan into the fridge for 4 hours.
11. Remove the cake from the refrigerator, slice it and serve. (you may use the hot tower to heat the sides of the pan to make it easier to remove)
Recipe adapted from 君之


妹妹好“班代”哦!!
ReplyDelete这个也是我喜欢的食谱之一:)
也征服了我的眼睛。。。*^_^*
ReplyDelete超想念的乳酪蛋糕,吃了真的会*飞天*的感觉!呵呵!^_^
ReplyDelete无法抗拒的乳酪蛋糕,有股冲动。。很想吃,嘻嘻嘻。。。
ReplyDelete有接班人了! 蛋糕看起来很美味!^^
ReplyDelete好顺滑哈。。。。隔夜吃一定更入味儿吧。。。。感恩节,感恩有你。。。。你做着、我吃着。。。happy
ReplyDelete