Friday, 26 February 2016

火爆的奶酪面包 【Cream Cheese Bread】


食谱被我看中后,收藏至今已经有两个月了。后来, 看到亲亲强烈的推荐, 就再也忍不住“出手”了。 一共做了两次, 第一次做了以下一半的材料, 结果没时间拍摄, 都被切分当了孩子们的早点 。 然后,大小丫头举起了她们的小拇指赞好, 儿子也频频点头赞许。


第二次, 做了双倍的分量, 这回每人都有得分了吧!见亲亲采用了夺目万人迷吐司的食谱, 无法否认这食谱的确是很迷人, 所以我也跟风了。 。

一样的食谱, 一样的白面包。 然而, 夹上了乳酪和沾上了一层奶粉, 就变得不一样。儿子说它不像面包, 很像在吃着蛋糕。 我说啊, 它是一款让人充满惊喜的面包!


【火爆的奶酪面包】

 面包材料

200克日本高筋面粉

60克克蛋糕粉

3克即溶酵母

60克蛋液(1粒)

120克鲜奶

20克细糖

2克盐

30克奶油


做法

1.  将所有材料放入面包机里搅拌15分钟(除了奶油)至面团混合。

2.  然后再加入奶油, 继续搅拌至15分钟至面团顺滑混合。

3.  取出面团, 分割成2等份, 并搓成圆球, 放入2个涂油的6寸烤盘模 (我用一个7寸和一个6寸圆模),发酵至双倍大。 

4.  送入预热烤箱里以170度烘烤25分钟, 如面包表面上色快, 亦可覆盖上一张锡纸。 


【乳酪内馅材料】180克乳酪(温室软化),20克糖粉、20克淡奶

【外层奶粉材料】30克奶粉,6克糖粉


[
乳酪内馅及奶粉的做法]

1.  将软化乳酪奶油和糖粉以搅拌机打至顺滑。

2.  分次的加入淡奶, 搅拌至均匀。  然后, 放入冰箱里冷藏30分钟。

3.  将奶粉和糖粉过筛, 放入一个大盘或碟子里。

4.  将冷却后的面包切成4份,并将每块面包以利刀在中间切2刀(不可切断哦)。

5.  以面包切刀抹入奶酪馅, 再把面包侧面也涂抹上奶酪馅。  最后将面包两侧都沾上过筛的奶粉即可。

 食谱参考亲亲@ Victoria Bakes


 Cream Cheese Bread
Recipe adapted from 亲亲@ Victoria Bakes


[Ingredients]
200g  bread flour
60g cake flour
3g instant dry yeast
1 large egg (60g)
120g full cream milk
20g sugar
2g salt 
30g butter

[Method]
1.  Place all the ingredients 
except butter) into the a breadmarker, let it knead for 15 minutes until all the ingredients come together .  (First, add the wet ingredients, then followed by the dry ingredients) 

2.  When all ingredients come together, add in the melted butter, continue kneading until the dough is smooth and elastic for 15 minutes.

3.  Divide the dough into 2 portions equally, then shape the dough into a balls and place it into greased 6 inches round mould ( i used 7 inches and 6 inches round mould)  to have of proofing until double in size.

4.    Bake in preheated oven at 170 C for 25 minutes. (Cover bread surface with foil if it turns to brown color too fast) 

【Cream Cheese Filling】:
180g Cream Cheese (at room temperature)
20g icing sugar, 20g evaporated milk

Milk powder coating
30g milk powder, 7g icing sugar

[To prepare cream cheese and milk powder]
1.  Cream cream cheese and icing sugar over a pot of simmering water till mixture is no longer lumpy.
2.  Gradually add in milk and mix well before adding in the next addition.  Chill in the fridge for 30 minutes. 
3.  Sift milk powder and icing sugar into a dish. 
4.  Slice bread into 4 portion, and make 2 slits in the middle (do not cut through)
5.  Spread cream cheese into a slit , spread filling on both sides of the bread.   Then, coat both sides of the bread with milk powder


Monday, 22 February 2016

紫薯喜粄 【Purple Sweet Potato Hee Ban】


不觉的又来到了新年的最后一天,随着元宵节的到来, 年味也逐渐淡出,农历新年也宣告结束了。 从一片欢呼声又走回到宁静, 一切又回归平静了。 

新年, 就这样又过了。 趁着今天尚有一丝新年的气息,赶紧将这道弥漫着欢乐气氛的旧作给贴了。 这道帖子不但洋溢着”家有喜事“也是充满了历史性的作品。   这是去年三月时, 看到娘子做的漂亮喜粄后,随着第二日, 这道喜粄也出现在我家了。 可想而知, 我呀还真是个”拖泥带水"之人啊!


没法子啊,去年的部落格实在是好热闹。 随着“糕点, 来了个”甜品“, 然后再来就是“点心”店开幕典礼。 接着又忙着月饼, 哎呀! 太忙了。。。。今天, 虽然也是从早忙到晚, 却依然记得这道“家有喜事”的帖子, 所以忙里偷闲的跑来写上几句! 同时也祝大家元宵节快乐!


【紫薯喜粄】

材料:
100克紫薯泥
135克清水
85克糯米粉
200克面粉
100克细糖
1茶匙即溶酵母

做法:
1) 将所有材料混合均匀成团, 盖上保鲜膜发酵3-4小时。
2)把面团分割成每个约50g,掌心抹上少许油,把面团滚圆,放在香蕉叶上。
3) 
再用掌心将圆面团轻轻的稍微压扁,排入蒸笼里,盖上锅盖,置边发酵15分钟。
4) 
把锅里的水煮滚,放入蒸笼,转中火,蒸12分钟至熟。
5) 
蒸好熄火(先别打开锅盖),在锅盖边缘开一条小细缝(2分钟后才打开)。
6) 
最后把喜板取出,放凉即可享用。

食谱参考Joceline@ Butter, Flour and me


【Purple Sweet Potato Hee Ban】

Ingredients
100g mashed purple sweet potato
135g water
85g glutinous rice flour
200g all purpose flou
100g castor sugar
1 tsp instant yeast

Method:
1) Mix all the ingredients until soft dough is formed,  cover dough with cling film and let it proof for 3-4 hours.
2)  Divide soft dough into 50g each, oil your hand with some cooking oil and shape the dough into round balls.  Then, place it on greased with oil banana leaves.
3)  Flatten the balls slightly,  cover the dough and let it proof for 15 minutes.
4)  Moving into boiled steamer and steam it over medium heat for 12-15 minutes. 
5)  Let it stay for 1-2 minutes before open the steamer .


This post is linked at Cook and Celebrate: Chinese New Year 2016 hosted by Yen from GoodyFoodies, Diana from The Domestic Goddess Wannabe and Zoe from Bake for Happy Kids at here.


Sunday, 21 February 2016

番婆饼 【Kuih Bangkit】


"番婆饼“是马来西亚的传统饼干, 也是华人春节里必备的年饼, 又名"薯粉饼“和”椰香饼“。新春期间,总会想起这香浓的椰奶味饼干, 于是每年都会掏荷包买一罐来吃。 

然后, 就决心要挑战这款每年必买的番婆饼。 说起这饼干, 就想起去年炒了木薯粉后,由于时间有限而无法在回乡过年前动手制作, 于是就将冷藏在冰箱里, 打算延迟才做。 结果, 年过了, 一日复一日, 人也懒了,最后就将那辛苦炒来的木薯粉扔了。 


今年同样的又炒了木薯粉,结果又将它放入冰箱里。这一摆又是7-8日, 几乎要将它遗忘了。 记得那日, 与甜姑娘聊起也提及了这款椰奶味的番婆饼。 
她也笑嘻嘻的问,“今年会再度将木薯粉扔了吗?” 
我回答,“可能, 可能啊! 哈哈。。。”
想想啊炒薯粉时, 炒到半死又站到累死,还有过筛薯粉的过程, 不但将厨房筛成了冰山雪地, 也将自己变成了雪人! 这善后的工作啊, 回想起真是心有余悸啊!


这饼干看似简单却把我难倒了, 参考了几个食谱都提到必须将薯粉炒至轻, 究竟这“轻”该有多“轻“?于是我就炒了30分钟。  取出那封尘的新木模, 应该是买了3年有余吧! 结果,以木模敲了3次, 虽然已经撒了许多薯粉, 但是每次必有面团塞在木模里。  除了第一回合时, 敲出了花纹都是美美的, 那时心里还沾沾自喜, 以为马到功成了呢!

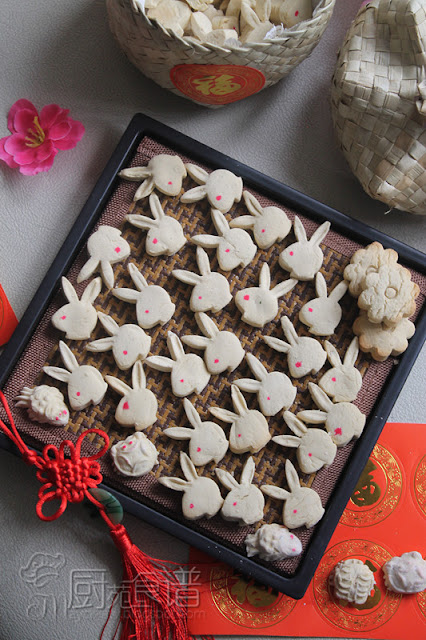
随着第一回合后, 接下来的就惨不忍睹, 最后我放弃了, 改以白兔切模来搞掂那些面团。 否则, 恐怕是敲到夜半三更依然也敲不完那些面团呢! 


【番婆饼】

材料:
500克木薯粉/250+250克木薯粉(余留一些作为撒面)
6片班兰叶, 洗净抹干后煎半
100 糖粉
1 粒全蛋
2 粒蛋黄
150-200克浓缩椰浆(我用180克)
3-4大匙奶油 (温室融化)

做法
1.  将木薯粉和班兰叶放入大锅里, 以小火炒约30分钟至木薯粉变轻。(这时的班兰叶已经变得酥脆了) 
2.  待冷却后, 谨慎的取出班兰叶, 再将木薯粉过筛2次。 然后,将木薯粉放入干净的塑胶袋里, 放入冰箱里收藏至少3日后使用。 
3.  将奶油和糖粉以搅拌机打至乳白顺滑。 
4.  慢慢的加入木薯粉,搅拌均匀。  然后, 分次的将椰奶加入,拌匀。  (余留一些椰奶备用)
5.  将面团揉至不粘手, 盖上湿布, 静置30分钟。
6。取一些木薯粉撒在木模里, 揪出小面团, 一个接一个的放入模子里, 紧压着。 然后, 以利刀切出多余的面团。
7.  轻轻的将饼敲出并排入撒有木薯粉的烤盘里, 放入预热烤箱以180度烘烤12-15分钟至底部微黄即可。  (我直接将面团擀扁至3mm 然后以饼模切出)

** 英文食谱请参考 Cooking Pleasure 和 Bake for Happy Kids


小丫头看了这批的白兔饼干, 说道: 哎呀! 妈妈, 你做了”playboy “饼干! 为什么不做猴爷呢?“ 哈哈。。


最后的结论就是, 这饼干做的不好, 但是味道却不错, 贴上做个纪录, 但愿明年还有那份毅力把这饼干做好!


This post is linked at Cook and Celebrate: Chinese New Year 2016 hosted by Yen from GoodyFoodies, Diana from The Domestic Goddess Wannabe and Zoe from Bake for Happy Kids at here.


Thursday, 18 February 2016

巧克力核桃曲奇 【Chocolate Walnut Cookies】


有人喜爱那沁入心底的甜味巧克力, 而有人却更爱那带点苦涩却又有点微甜的巧克力。 不管怎样,只要是适合自己的口味, 就算是再苦再涩的巧克力, 吃在嘴里也会有丝甜滋滋的感觉。 就如这款的巧克力曲奇, 加入了苦涩黑巧克力, 入口有些苦, 带着浓浓的涩。  可是当你在慢慢的细细的品, 就会感受到它那苦后甘甜真情的一面。 


巧克力有甜也有苦涩的, 喜欢巧克力的人, 不管它是甜或是苦都依然觉得它好吃。我家的那位喜爱巧克力的俏姑娘, 自称是巧克力的最佳情人, 不管是苦的还是甜的,皆逃不过她的那张小嘴。 

姑娘说, 只要嘴里咬着任何巧克力食品, 不管什么伤心难过的事故都会暂且被忘却。 当第一口咬下巧克力饼干时, 就已是招架不住了, 那淡淡的甜, 唇齿留香而久久不散。 那一刻, 回味的是那巧克力之味, 什么心伤啊什么不如意之事都得靠边站了! 


巧克力核桃曲奇】

[材料]
125克奶油
160克黄糖
1茶匙香精
1粒鸡蛋 (60克连壳)
180克普通面粉
1茶匙泡打粉
1大匙可可粉 (原谱没加)
150克苦涩黑巧克力豆
100克烤香核桃, 切细块

做法
1.  将黄糖和奶油以搅拌器搅拌至乳白淡色, 加入鸡蛋和香精拌匀。
2.  筛入面粉, 可可粉和泡打粉, 拌匀后再加入黑巧克力豆和核桃, 以橡皮刮刀翻拌均匀。
3.  以勺子舀起一小块饼干面糊, 放在铺有烘纸的烤盘上, 稍微留点空隙。
 4.  放入预热烤箱175度烘烤约18分钟至熟即可。  

**  不爱苦涩巧克力者亦可采用甜味巧克力。
**  这类型的曲奇无需用到模具,所有面糊的厚度尽量保持一致, 以避免饼干无法熟透。  
食谱参考于Min's Blog谢谢Min的分享!


【Chocolate Walnut Cookies

[Ingredients]
125g unsalted butter
160g brown sugar
1 tsp vanilla essence
1 large egg (with shell 60g)
180g all purpose flour
1 tsp baking powder
1 tbsp coco powder (optional)
150g extra bitter dark chocolate chips (Belgium)
100g roasted walnut, chopped into small pieces

Method
1.  Cream butter and brown sugar at medium speed till light and fluffy.  
2.  Add in egg,  vanilla essence and mix well.
3.  Sift in flour, coco powder and baking powder, mix well.  Then, add in dark chocolate chips and roasted chopped walnut, fold well by using a rubber spatula.  
4.  Scoop a small  balls of batter and place it on baking tray. 
5.  Bake in preheated oven at 175C for 18 minutes until cooked.

  ** To ensure the thickness of the batter as consistent as possible in order to avoid cookies can not be cooked. 
Recipe adapted from Min's Blog


脚步慢了, 手也懒了, 依然还是年饼。我得赶紧加快步伐, 可别让这些年饼留年了! 呵呵。。。


This post is linked at Cook and Celebrate: Chinese New Year 2016 hosted by Yen from GoodyFoodies, Diana from The Domestic Goddess Wannabe and Zoe from Bake for Happy Kids at here.


Related Posts Plugin for WordPress, Blogger...