Thursday 29 September 2016

糯米酿鸡翼 【Glutinous Rice Stuff Chicken Wings】


几个月前, 在云南丽江省吃过这道很棒的糯米酿鸡翼, 对它念念不忘。  纳闷的是, 自认为没那份耐心和能耐去除鸡翼里的小骨,耗时又耗事啊! 和他闲聊时, 提到这道鸡肴, 他竟然一诺无辞的答应了这份去除鸡骨的差事, 原来啊, 他比我更加挂念这道佳肴呢!无论如何, 谢谢亲爱的你!


中秋节的晚餐, 兴致勃勃的预备了这道糯米酿鸡翼,边煮边拍摄下了几道菜肴, 搞到锅铲都掉落地数次,狼狈至极!老懵懂的我, 竟然以为已经将所有图片转至电脑了, 就一口气的删掉了相机里的原图, 发现时为时已晚, 只余留了数张的图片,欲哭无泪了! 

在网上找到小小米桶的食谱作为参考, 不同的是在云南吃的是以烤式, 而这个食谱是以慢火来煎。 当然, 要煎要烤的都任由你来作主咯。   


糯米酿鸡翼

[材料]
10只鸡翼 (越大只越好)
10支牙签
2 瓣蒜。 切片
5片姜

[鸡翼腌料]
1 大匙酱油
2大匙花雕酒
1/2茶匙胡椒粉
1茶匙蒜蓉
1大匙姜汁

【酱料】
2+1/2大匙酱油
3大匙花雕酒
1/2茶匙黑酱油
1大匙黄糖
150克清水

【糯米馅料
适量糯米饭(亦可用2粒粽子取代)
糯米饭的照片全都被删除了, 所以食谱我也不分享了, 可以参考小小米桶~生炒糯米饭, 好好吃哦!

做法
1.  将鸡翼洗净, 然后剪去鸡翼小腿,余留鸡翅膀部分使用。 
2.  以剪刀将黏在鸡中翅骨头部分的筋和肉剪开, 再沿着骨头慢慢将肉脱骨, 然后再以利刀将肉刮下。(不要刮破鸡外皮, 导致酿入的内馅漏出)
3.  脱骨时, 一边手抓着鸡翅, 另一边抓着细骨, 将细骨捏折使得中翅和翅尖之间的关节分离, 再将两根的细骨扭断及拆除。
4.  除去细骨的鸡中翅如口袋般, 即可填入糯米内馅了. 
5.  将去骨鸡翅加入腌料腌制30分钟或隔夜, 备用。
6.  将煮好的糯米饭填入鸡翅里至8分满即可, 以牙签串起封口。 (不可填入过多的内馅, 否则在煎煮的过程中, 鸡翅膀回收紧缩, 导致糯米爆漏)
7.  热锅子, 加入少量的油, 将醸鸡翅放入锅里, 以中火煎至两面至上色。  
8.  加入蒜片和姜片, 爆香。  再倒入酱汁煮滚。  盖上锅盖以小火焖至5-7分钟, 再打开锅盖, 翻面煮至收汁即可,  趁热享用。(也可以烤箱代劳哦!)


【Glutinous rice stuffed chicken wings

[Ingredients]10 chicken wings (prefer bigger size )
10 toothpick
2 cloves garlic, sliced
1 tbsp chopped ginger

[Seasoning for marinade]
1 tbsp soya sauce
2 tbsp shaoxing wine
1/2 tsp white pepper
1 tbsp chopped garlic
1 tbsp ginger juice

sauce
2+1/2 tbs soya sauce
3 tbsp shaoxing wine
1/2 tsp dark soya sauce
1 tbsp brown sugar
150g water

【Glutinous rice filling
The right amount of glutinous rice or 2 zongzhi/Dumplings
For glutinous rice recipe, please refer to mitongwu.  I wont share the recipe here as all the glutinous rice photos were accidently deleted.  

【Method】
1.  Wash and drain the chicken wings, cut off  the upper part of small wing and remain the lower part of chicken wing.  
2.  Scissors and cut the ribs bone parts, then slowly use a knife to scrape the meat. (do not cut the skin of chicken, this will cause the leaking during of stuffing)
3.  Then, pinching off wing tips and separate the wing joints, removed the small bone.  
4.  After the fine bone have been removed, it will as pocket-like, you may stuff with glutinous rice.
5.  Combine chicken wing with marinade and marinate for 30 minutes or overnight.
6  Stuff the glutinous rice into the pocket until 80% full, seal with toothpick.  ( do not overstuffed, otherwise during the cooking process, the glutinous rice will leakage)
7.  Heat up wok,  add a small amount of oil and place the marinate chicken wing into a pot.  Ffy with medium heat until both sides turn of color.  
8. Then,  pour the sauce and bring to boil.  Saute ginger and garlic, cover and simmer over low heat for 5-7 minutes.  Then open the lid and flip and cook until sauce amost dry.  Serve hot.  


没有露馅的图片, 其余的图片全都删掉咯!


Friday 23 September 2016

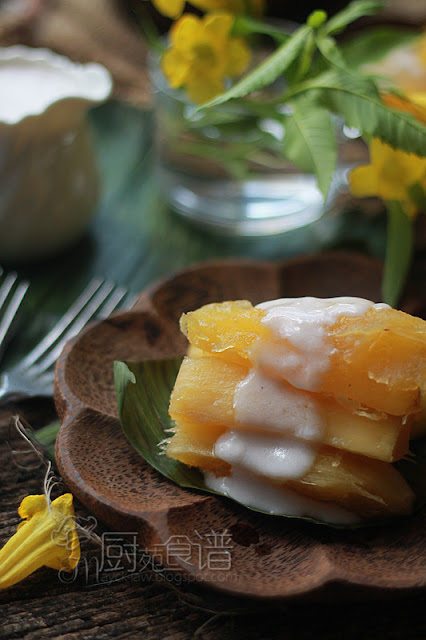
泰式椰奶木薯 【Tapioca in Coconut Syrup, Mann Supalang Cheamm)


这是一道泰国常见的传统甜品,做法简单却让人百吃不厌。 以往我都是随意的将木薯蒸熟, 然后再淋上椰奶和椰糖酱, 随便做也随便吃咯, 也从未曾将其贴上!

这回我也跟着泰式传统做法, 将木薯加糖和清水一起煮熟, 让糖浆慢慢渗入木薯。 接着, 将熟透的木薯捞起, 把熬煮的浓稠椰奶淋上, 即是一道著名的泰式甜品之一。


香浓的椰奶, 配上软软棉棉的木薯, 让人吃不停口。 原本只想吃上几口, 然后将其打包送往弟弟家去, 谁知不知觉得吃了过半,这可把我吓坏了。 这甜丝丝的甜品, 还真是”引人犯罪“呢!


【泰式椰奶木薯】

[材料]
650克黄肉木薯
200克黄糖
400克清水(盖过木薯)
6片班兰叶 (打结)

【椰奶酱】
250克椰奶
盐适量
1+1/2茶匙薯粉+1大匙清水(调匀)

【做法】
1.  木薯去皮, 打直切半后再切成8cm的长段, 待用。
2.  取一锅, 加入木薯段,黄糖, 班兰叶以及清水(清水必需盖过木薯), 以中火煮滚后转小火, 继续煮至木薯熟透至呈透明状。  享用时, 才取出木薯沥干。
3.  椰奶酱:  将椰奶材料以小火煮至小滚, 拌至均匀稍浓即可。 (若椰奶酱太稀, 亦可略加薯粉水)。 
4.  取出木薯, 将椰奶酱淋在木薯上即可享用。


 【Tapioca in Coconut Syrup~Mann Supalang Cheamm】

[Ingredients]
650g yellow tapioca 
200g brown sugar
400g water (enough water to cover)
6 pieces pandan leaves (tight into a knot)

【Coconut syrup】
250g coconut milk
1/4 tsp salt
1+1/2 tsp tapioca flour + 1 tbsp water (mixed)

【Method】
1.  Peel tapioca, cut into 8cm, set aside.
2.  Place tapioca, brown sugar, pandan leave and water in a pot, cook over medium heat until just boiled.  Continue cook over small heat cook until tapioca soft and turn translucent (It will take around 20 to 30 minutes).  Drain the tapioca before serving.
3.  To cook coconut syrup, mix all the ingredients in a pot, cook over small heat until it just boiled.  (if the sauce is too thin,  add additional of tapioca flour)
4.  Pour sauce over tapioca, serve warm or cold.


Thursday 15 September 2016

蛋香上海月饼 【Shanghai Mooncake】


临时赶出来的月饼,烤完已经是夜半三更了。  捧着两盘的月饼上楼,待冷却后做包装, 搞到睡房里弥漫着阵阵的月饼香味。  漫漫的长夜里, 这一股月饼香伴我入睡, 有幸福吧!


买了25粒的咸蛋了, 敲了2粒皆是双黄的, 然后就继续敲了一粒接一粒, 感觉非常的兴奋。 结果敲了15粒而当中9粒是双黄的, 太稀奇了!可惜太夜了, 而我又在赶工, 否则一定将它收纳在镜头里。  


蛋香上海月饼, 可做14粒~食谱·参考这里

皮料
100克糖粉
280克面粉
65克奶粉
50克蛋黄粉
15克帕马森乳酪粉
1 茶匙发粉
150克牛油
2粒鸡蛋(打散)

【馅料】
820克芋头馅+50克烤香杏仁片
14粒咸蛋黄 

做法, 请参考这里
做了以上2倍的分量, 共做了24粒~125克, 将剩余的做了迷你型的翡翠馅


【Shanghai Mooncakes】

Skin Ingredients:
100g icing sugar
280g all purpose flour
65g full cream milk
50g custard powder
15g parmesan cheese
1 tsp baking powder
150g unsalted butter
2 eggs (beaten)

Filling:
820g yam paste + 50g roasted almond slice
14 salted egg yolks

 Please refer  HERE for the method and preparation。


预备材料时, 才发现冰箱里的芝士粉用完了, 没辙了就以别的材料替代吧!  


大丫头只吃翡翠馅,买了1公斤馅做也做不完,够力了! 


Wednesday 14 September 2016

广式五仁月饼【Traditional Mixed Nuts Mooncakes】


这么多月饼当中, 我唯独不吃五仁月饼。  尽管五仁馅都是满满的香脆果仁,我依然将它拒之千里之外, 更别谈孩子们了。 这款月饼照理来说,在我家应该是和它脱离关系,断绝来往了。   可是,五仁月饼却是他的心头之爱, 为了博取“君子一笑” ,我还得年年为君而做呢!嘻嘻。。


食谱参考这里, 共做了11粒 

小小记录:  月饼重量130克, 皮35克+五仁馅95克


原本不打算拍摄, 吃剩几粒了才决定拍下记录。


传统月饼~莲蓉馅 【Traditional Mooncake~Lotus paste】


做了一小份的莲蓉馅月饼, 随意的拍了几张做个记录吧!


传统月饼~白莲蓉馅共做7个80克, 2个125克

[月饼皮材料]
150克底筋面粉
105克糖浆
28克花生油
1/4茶匙碱水

【馅料】
320克白莲蓉+50克烤香杏仁片 


【做法】
1.  将糖浆, 碱水和花生油混合均匀, 加入面粉搅拌成面团, 静置2-3小时至不粘水后方可使用。
2.  将面团分割成适合模具的份量, 搓圆。 
3.  将面团擀成圆形,包入有份馅料, 收紧封口, 搓圆。
4.  将裹好的月饼球放入月模里, 以手指紧压, 直接压入烤盘里。
5.  送入预热烤箱以170度烘烤10分钟, 取出, 静置10分钟至冷却后, 涂上有层蛋液。
6.  再度送入烤箱里, 继续烘烤15分钟至熟或上色。
7.  取出, 放在铁架上散热, 待回油2-3天后即可享用。


给自己的记录, 这个食谱共做了以下的份量:
~ 月饼重量80克, 馅料35克+1粒咸蛋黄
~ 月饼重量80克,馅料50克无咸蛋

~ 月饼重量125克, 馅料75克+1粒咸蛋黄)

【Traditional Mooncakes~ White lotus paste】
yields 125g~2 mooncakes and 80g ~ 7 mooncakes

[Dough ingredients]
150g low flour/cake flour
105g golden syrup
28g peanut oil or cooking oil
1/4 tsp alkaline water/lye water

【Filling】
320g white lotus paste + 50g roasted almond slice 

[Method]
1.  Combine all the ingredients (except flour), mix well. 
2.  Add in flour into syrup mixture, mix to florm a soft and smooth dough.  Cover dough with plastic clip wrap and let it rest for 2 hours at room temperature.  
3.  Divide dough accordingly to fit your mooncake moud and shape into balls. 4.  Flatten a portion of dough, place a ball of filling into the centre, wrap up and seal edges.  
5.  Press gently into a mooncake mould, slowly remove the mooncake and place on a baking tray.
6.  Bake in preheated oven at 175C for 10 minutes, remove from oven and leave mooncakes to cool for 10 minutes.  Brush mooncakes with glaze (egg wash)
7.  Return mooncakes to oven and continue to bake for 15 minutes. 8.  Remove from oven and store mooncakes for 2 days to allow pastry to soften before serving.

For my own records:
~ weight of mooncake 80g, filling 35g + 1 egg yolk
~ weight of mooncake 80g, filling 50g without egg yolk
~ weight of mooncake 125g, filling 75g + 1 egg yolk


Related Posts Plugin for WordPress, Blogger...