Thursday, 30 June 2016

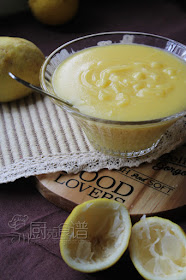
柠檬果酱 【Lemon Curd】


柠檬浑身都是宝贝, 柠檬果皮,柠檬汁或柠檬果肉都可以食用或是制作药物。  市面上也愈来愈多有关柠檬的产品, 柠檬油, 柠檬面膜等,层出不穷的柠檬产品。  记得第一次在妈妈的园中看见了柠檬树上的几朵柠檬花, 甚至还有一些柠檬花的蓓蕾, 很“山龟”的取出手机拍了几张。  喜欢柠檬的他, 就即刻向妈妈拿了一棵幼苗, 种植在家里的园中了。

经过一年的风吹雨打, 柠檬树也在大自然的维护之下长得“亭亭玉立”了。  据知柠檬四季开花, 唯独我家的那棵柠檬树, 即不开花也不结果。 为了这棵柠檬树,他从医寻问了许多人, 也成了种植柠檬树的专业顾问。 可惜这棵柠檬树,依然顽固的不开花, 不结果。  


【柠檬酱】
2个鸡蛋, 100克柠檬汁, 100克细砂糖, 1个柠檬皮屑, 60克无盐奶油

做法
1.  将所有材料倒入小锅里混合, 用双烤盘在热水上搅煮至浓稠(隔水煮法)。
2.  离火, 过滤, 待冷却备用。

食谱参考了Joceline , 但是我只做了2粒蛋的食谱,  当时家里只剩2粒鸡蛋料! 呵呵。。。 


LEMON CURD】
2 eggs
100g lemon juice
100g castor sugar
zest from 1 lemon
60g unsalted butter

Method
1.  Place the eggs, butter, salt, lemon juice and lemon zest into a bowl.
2.  Place the bowl over a saucepan with simmering water (boil the water, then reduce the heat to simmer).
3.  Whish all the time until the mixture thicken and combined.  Remove from heat, sift the mixture twice and let it cool, set aside.


拍了一批黑漆漆的照片, 一心想要来个白色背景的, 谁知就是无法得逞! 


以下这张是好久以前做的柠檬酱, 采用了妈妈家自栽的柠檬果, 而食谱则参考这里的。  


Tuesday, 28 June 2016

黄姜饭 【Turmeric Rice/Nasi Kunyit】


黄姜饭是马来同胞和印尼人的常见主食。 在这斋戒月期间, 走在各区的斋戒月市集, 若想吃这道黄姜饭绝非难事。  生活中的每一餐, 总是少不了这米饭, 这道黄姜饭平时只能在外用餐时享用,在家里的餐桌上极少会出现这类”黄又黄“的饭, 今天算是破例了。 

量了3杯米之后, 心里却又惴惴不安, 不知大丫头是否会埋怨的瞪着这一碟的黄姜饭发呆。  于是, 另外又未雨绸缪的为丫头煮了半杯子的白米饭。  这妈妈也太窝囊了, 总是为了一些芝麻绿豆之事而烦, 这回居然为了这区区的3杯米粒而而提心吊胆, 实在是可笑也可悲啊!


今日, 丫头也破戒了。  她冷眼旁观的望着那一碟的黄姜饭, 然后吸了一口气说着”很香叻!很像椰浆饭的味道“。  这道久违的黄姜饭在我家, 终于冒出头来了, 嘻嘻。。。


黄姜饭】 
3 杯白米(洗净, 滤干水份)
2 片班兰叶(打结)
180克浓椰浆
400克清水(相同于平时的煮法, 水的份量视乎于米的种类而定, 请自行调整)
30克黄姜(磨碎取汁)
2支香茅(拍扁)
20克姜(拍扁)
适量盐巴调味

【做法】
1.  将白米, 班兰叶, 黄姜汁, 香茅,姜以及清水放入电饭煲中, 搅拌均匀, 按掣饭煲。
2.  当米饭煮至滚起泡沫时(半熟), 慢慢的加入椰浆和盐巴, 继续煮至成熟饭。
3.  饭煲熟后, 弃掉班兰叶, 翻拌使之松软, 配搭咖喱鸡, 香茅鸡即可上桌食用。


【Turmeric Rice, Nasi Kunyit】


[Ingredients]
3 cup long grain rice (Rinse rice and drain well)
2 pieces pandan leaf (knotted)
180g coconut milk
400g water (same as usual cooking method, water level adjust according to type of rice)
30g fresh turmeric (grind and take juice)
2 lemongrass stalks (flatten)
20g ginger (flatten)
adequate amount of salt

【Method】
1.  Add rice, pandan leaf, turmeric juice, lemongrass, ginger and water into an electirc rice cooker, mix well.  Press the button to cook.
2.  Add in coconut milk and salt while it is boiling and burbbling, continue to cook until the rice is cooked. 
3.  After rice is cooked, discard the pandan leaves and serve with curry chicken or lemongrass chicken.  


Saturday, 25 June 2016

黑钻吐司 【Black Diamond Toast】


这黑钻吐司,搓了面团后, 还得搅拌蛋糕糊, 步骤多多, 感觉挺麻烦咯。  正因如此,此食谱就这样被我收藏冬眠至今。  终于,驱散了那股懒意, 将它从冰山一角挖了出来伸腰透气了。  

黑钻吐司, 基本上就是一款以蛋糕和面包所组合而成的蛋糕吐司, 这吐司的外皮裹上了一层浓香的可可海绵蛋糕, 让人一试便爱上了。 哎哟!  如此棒的吐司,竟然被我封闭了许多, 懊恼啊!


做了以下双份的食谱, 不到两天就已经被吃光了, 非常畅销的吐司, 省下了涂果酱的过程。 此外, 还得感谢友人的漂亮道具, 喜欢极了!


【黑钻吐司

[面团材料】
100克高筋面粉
25克低筋面粉
22克细砂糖
8克奶粉
2克盐
1.5克即溶干酵母
80克鲜奶 (各种面粉有着不同的吸水量, 请自个衡量)
10克无盐奶油

[可可海绵蛋糕材料]
3粒大蛋(每个带壳67克), 分开蛋黄和蛋白
70克黄糖(原者用白砂糖)
80克低筋面粉
55克鲜奶
30克奶油/牛油
10克可可粉 (原者以20克的可可粉)
10克黑可可粉

做法
1.  提前在吐司模里涂上一层奶油, 我用的是三能金色不黏吐司模, 所有亦可省略此步骤
2.  将所有材料放入面包机里搅拌15分钟(除了奶油)至面团混合。
3.  然后再加入奶油, 继续搅拌至15分钟至面团顺滑混合。
4.  取出面团滚圆放入盆中以湿布盖好, 进行基础第一次发酵至双倍大(60分钟)。
5.  发酵结束后, 取出面团滚圆排气, 擀平后卷起来放入吐司模中间, 进行第二次发酵至6分满即可。(不要将面团摆贴着模子内壁, 因尚需倒入蛋糕糊)
6.  在第二次发酵至4分满时, 此时可以预备蛋糕的材料。奶油和鲜奶隔热水融化,然后筛入可可粉, 搅拌成细腻光泽的可可糊。
7.  蛋白和蛋黄分开, 将蛋白干净的搅拌盘里, 以三次加入黄糖打至硬性发泡。
8.  将蛋黄逐粒加入打发的蛋白里, 以低速搅拌至混合均匀。  (每次必需等至蛋黄充份被搅拌后才加入另一粒)
9. 加入过筛的低粉翻拌均匀, 不要划圈搅拌,防止小泡。
10.  加入步骤(6)的可可糊, 翻拌均匀。  此时观察一下吐司是否发酵完毕, 如尚未达到要求, 暂且将蛋糕糊放入冰箱里冷藏。
11.  发酵完毕后, 将蛋糕糊从高处倒入吐司模里, 震出气泡后放入预热烤箱里175度至30分钟 (依照自家的烤箱温度而定) , 烤至蛋糕表面成稍硬后以小刀子划一条切口,然后继续烘烤。
12.   取出, 将面包放置铁架上放凉。(无需倒扣)

食谱取自这里


【Black Diamond Toast


[Ingredients】
175g bread flour
80g all purpose flour
10g castor sugar
5g milk powder
4g salt
3g/1 tsp instant yeast
155g fresh milk
15g unsalted butter

[Chocolate Sponge Cake Ingredients]
3 large eggs (with shell 67g each), yolk and white separated.
70g brown sugar (original recipe used castor sugar)
80g cake flour
55g fresh milk
30g butter
10g cocoa powder
10g dark cocoa powder

Method
1.  Place all the ingredients except butter) into the a bread marker, let it knead for 15 minutes until all the ingredients come together .  (First, add the wet ingredients, then followed by the dry ingredients) 
2.  When all ingredients come together, add in butter, continue kneading until the dough is smooth and elastic for 15 minutes.
3.  Cover dough with wet cloth and let it proof until doubled in size (about 60 minus).
4.  
Sprinkle some flour over the work surface, place the dough on it and press the dough to release the air.  Flatten it,  roll it with rolling pin and roll up like swiss roll.  Place the dough into the middle of loaf pan to have of second time proofing until the dough reaches 60% of height of pan. 
5.  When reaches 40% proofing , you may preparing the sponge cake ingredients.    In a small bowl, melt the butter and fresh milk by using double boiled method.  Then, sift in both cocoa powder, stir the mixture until it fully combined. 
6.    Separate egg white and yolk.  Whisk egg whites until mixture forms soft peaks,  gradually add in sugar and continue whisk until frothy and stil peasks form. 
7.  Turn the mixer to slow mode,  then add in egg yolk, beat well after each addition of egg yolk until creamy. 
8.  Gradually fold in cake flour  and mix well until incorporated. (do not over mixed) 
9.  Spoon about 1/4 of mixture into cocoa mixture, mix well.  Then, pour the cocoa batter back to the main mixture, fold until well mixed.  At this point, do check the status of  fermentation, if not yet meet the requirements, you may keep the cake batter into the refrigerator for the time being.
10.  After the fermentation is completed, pour the cake batter into the loaf pan, lightly tap the pan to remove air bubble.  
11.  Bake in preheated oven 175C for 35-40 minutes or until cooked


Tuesday, 21 June 2016

英式山峦吐司 【English Toast】


忙碌时, 吐司是我最佳之选。  不必耗费太多的时间包着内馅, 然后再一粒接一粒的搓着面团, 实在是省时也省事了。 记得几年前, 吐司在我家是还是相当冷门的, 都被孩子们拒之门外了。 看到餐桌上摆着一片片空了了的吐司, 总是一脸心不甘情不愿的模样, 还得逼着他们动手涂上果酱。 

走过了成长的岁月, 渐渐地孩子们对吐司亦有所改变了。  岁月不但使他们成长, 也改变了孩子们对于味道的爱好和口味。  而今, 吐司已成为我家最热门的面包了。    


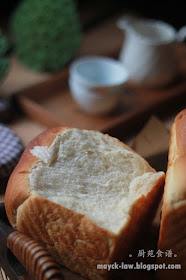
转回话题, 关于这英式山峦吐司,也是一级棒的吐司。  家里没了日本面粉, 唯独以高筋面粉代之, 面包依然松软, 竟连吐司边的外皮也是一样的蓬松。  山峦即是山峰也是山形之意, 这吐司有像高峰吗?嘻嘻。。


英式山峦吐司】

[材料
175克高筋面粉
80克中筋面粉/普通面粉
10克细砂糖
5克奶粉
4克盐
3克或1茶匙即溶干酵母
155克鲜奶 (各种类似的面粉有着不同的吸水量, 请自个衡量)
15克无盐奶油

【做法】
1.  将所有材料放入面包机里搅拌15分钟(除了奶油)至面团混合。
2.  然后再加入奶油, 继续搅拌至15分钟至面团顺滑混合。
3.  取出面团滚圆放入盆中以湿布盖好, 进行基础第一次发酵至双倍大(60分钟)。
4.  发酵结束后, 取出面团放在撒有高粉的桌面上, 平分割出3份, 滚圆, 盖上湿布休面15分钟。
5.  将松弛后的面团擀成椭圆形, 由上而下的卷起, 松弛10分钟后再擀成长条, 卷起 。
6.  将面团放入吐司烤模里, 进行第二次发酵至9分满。  (亦可取一杯热水帮助提高温度, 让面团加速发酵)
7.  将烤模放入预热烤箱里175度至35分钟至表面呈金黄色即可。
8.  取出, 将面包放置铁架上放凉。

【食谱参考于在家也能简单烘焙日式面包】


【English Toast

[Ingredients】
175g bread flour
80g all purpose flour
10g castor sugar
5g milk powder
4g salt
3g/1 tsp instant yeast
155g fresh milk
15g unsalted butter

Method
1.  Place all the ingredients except butter) into the a bread marker, let it knead for 15 minutes until all the ingredients come together .  (First, add the wet ingredients, then followed by the dry ingredients) 
2.  When all ingredients come together, add in butter, continue kneading until the dough is smooth and elastic for 15 minutes.
3.  Cover dough with wet cloth and let it proof until doubled in size (about 60 minus).
4.  
Sprinkle some flour over the work surface, place the dough on it and press the dough to release the air.  Divide the dough into 3 portions equally, roll it into ball shape and rest for 15 minutes.
5.  Flatten it and roll up like swiss roll and rest for 10 minutes.  Then, roll it again into long strip, and roll up like swiss roll.
6.  Place in into greased loaf pan to have of proofing until the dough reaches 90% of height of pan.
7.  Bake in preheated oven at 175C for 35 minutes until it golden brown . (you may cover bread surface with foil if it turns to brown color too fast)

【Recipe adapted from Simple and easy Japanese Bread】