Friday, 15 January 2016

巧克力雪球曲奇【Chocolate Snowball Cookies】


听人说过, 秋天总会让人容易伤感, 
我却认为, 春天也一样让人充满感怀, 
或者, 不管是春夏秋冬都一样让多愁善感的人有感而发吧!
尽管多么的希望能抓住这一刻,
但学校假期还是如期的结束了。 
尽管多么希望能让时光停留, 
转眼又过了三百六十五个日日夜夜。
近来的气候变化多端也难以捉摸, 
时而阳光普照, 热得让人只想窝在沙发上任时间停留,  
时而又乌云布满, 雷雨连绵不断。
连绵的雨声, 带来了春的气息, 
春雨来了,  春的味道也愈来愈浓了!


春息近了, 看到姐妹们都在忙碌的制作年饼, 搞到我不止手痒心更痒了。 就先来个圣诞节时来不及做的雪球曲奇, 然后再将它打扮成春节里一份子吧!好吃的曲奇, 裹了一层的白色的糖衣, 让你的舌头预先尝尝甜头, 口感非常的棒哦!


【巧克力雪球曲奇, 共做31个】

[材料]
55克无盐奶油(室温软化)
25克糖粉
50克普通面粉
15克杏仁粉
10克可可粉
40克核桃碎(无需烤香)
适量糖粉(装饰所用)

【做法】
1.  将软化奶油和糖粉打发至乳白。
2.  筛入面粉, 杏仁粉和可可粉混合均匀, 然后加入核桃碎拌匀成团。
3.  将面团揉成圆条, 以保鲜膜裹好, 放入冰箱里冷藏5-6小时。
4.  取出, 分割成31份(每个6克), 搓成小圆球, 摆置烤盘上。
5.  放入预热烤箱165度, 烘烤22分钟至熟。
6.  将出炉后的巧克力雪球, 立即滚上糖粉,待稍微冷却后再滚上一次糖粉, 收入密封的罐子里。

** 步骤(6)的做法, 亦尝试了冷却后才滚上一层糖粉, 效果较漂亮!


【Chocolate Snowball Cookies】

[Ingredients] 
55g unsalted butter (at room temperature}
25g icing sugar
50g all purpose flour
15g ground almond
10g cocoa powder
40g walnut (chopped and without roasted)

** powdered sugar

【Method】
1.  Cream butter and icing sugar till light and fluffy. 
2.  Fold in sifted flour, ground almond and cocoa powder, mix well.  Then, add in chopped walnut and mix well by using the spatula. 
3.  Roll soft dough into a round bar, wrapped with cling paper and refrigerate it for 5-6 hours.
4.  Divide the dough into 31 small portions (6g each), shape them into small balls and subsequently place them on baking tray. 
5.  Bake in preheated oven at 165C for 22 minute or cooked.
6.  After being removed from the oven,  roll in powdered sugar while still warm and again when cool.

** For method 6, you may left the balls to be cooled before being rolled in powdered sugar. 


This post is linked at Cook and Celebrate: Chinese New Year 2016 hosted by Yen from GoodyFoodies, Diana from The Domestic Goddess Wannabe and Zoe from Bake for Happy Kids at here.


Wednesday, 13 January 2016

客家酿豆腐【Hakka Yong Tau Foo】


如今的酿豆腐, 经过店家的演变, 酿豆腐变得种类繁多了。 广式酿豆腐的种类较多, 有羊角豆, 苦瓜, 子, 鱼丸等等。一般酿制的馅料, 皆以鱼肉为主, 然后加入猪肉碎, 再加入调味料拌匀, 酿肉即可。 

虽然, 客家的酿豆腐, 主要是以五花层肉为主, 而且馅料一定要肥。但是, 不吃猪肉的我, 怕闻到那股猪腥味, 只好将猪肉换成鸡肉了。 客家人还有另一套酿豆腐的吃法, 就是做酿豆腐时, 一定要预备生菜, 把豆腐包起来食用。 

据说, 像这类市场上售卖的酿豆腐, 包括了各种蔬菜, 花样多多的, 除了豆腐以外,只能称之为酿杂锦! 所以, 这道经过改良的客家酿豆腐, 也已经是名不正, 言不顺了。


1
【客家酿豆腐】

材料
5个豆干
400克鱼胶肉
200克鸡肉碎
20克梅香咸鱼(煎香, 切碎)
3粒红葱头(切碎)
1棵青葱 (切粒)

调味料A1/2茶匙胡椒粉,1 茶匙盐, 1茶匙麻油, 1/2茶匙糖, 1大匙粟粉

调味料B  1大匙蚝油, 1茶匙麻油, 300毫升江鱼仔高汤

做法
1.  豆干洗净, 切对半。  在侧面切口,挖洞。
2.  将鱼胶肉和鸡肉碎加入调味料A拌匀, 加入咸鱼碎以及红葱碎,搅拌均匀。
3.  将拌匀的内馅酿入豆干里, 以热油炸至呈金黄色即可, 沥干油份。
4.  然后, 将炸好的豆干放入锅里, 加入调味料B 再以中火焖煮至8分钟, 撒上青葱粒即可食用。 


【Hakka Yong Tau Foo】

Ingredients
5 pieces tau kwa (firm beancurd)
400g fish paste
200g chicken (minced)
20g mei xiang salted fish (pan-fry and chopped)
3 shallots (chopped)
1 spring onion (diced)

Ingredients A:1/2 tsp pepper, 1 tsp salt, 1 tsp sesame oil, 1/2 tsp sugar, 1 tbsp corn flour

Ingredients B:  1 tbsp oyster sauce, 1 tsp sesame oil, 300ml anchovies stock

Method
1.  Rinse tau kwa, cut into halves and dig a hole on the side of each half.  
2.  Mix minced chicken and fish paste, add seasonings A, then blend in salted fish and chopped shallots, mix well.
3.  Fill tau kwa with the meat mixture.  Deep-fry with hot oil till golden brown.  Remove and drain.
4.  Place tau kwa in a pot and add seasoning B,, braise over medium heat for about 8 minutes, sprinkle with spring onion before serving. 


煮好了晚饭,天色已是灰蒙蒙的一片, 飞快的咔嚓了几张, 赶紧开饭去了!


Friday, 8 January 2016

万人迷夺命吐司, 一次发酵【The Killer Toast, just one proofing】


假期里, 最令人心烦的事莫过于是睁着半开的双眼,
或尚未睁开双眼而孩子们已经站在床前,
追问着“妈咪, 没有早餐, 我们吃什么?”
也不想披着懒散的脚步出外“打包”早餐,
更不想带着那睡不醒的双眼, 
让人一眼就望穿我那刚睡醒的丑样。
为了能一觉睡至自然醒, 
为了不被孩子们吵醒,
于是, 总是预先烤好面包放着, 
然后, 叮咐孩子们各自涂上喜爱的酱料, 
不好吵醒正在沉睡中的懒妈妈! 嘻嘻。。


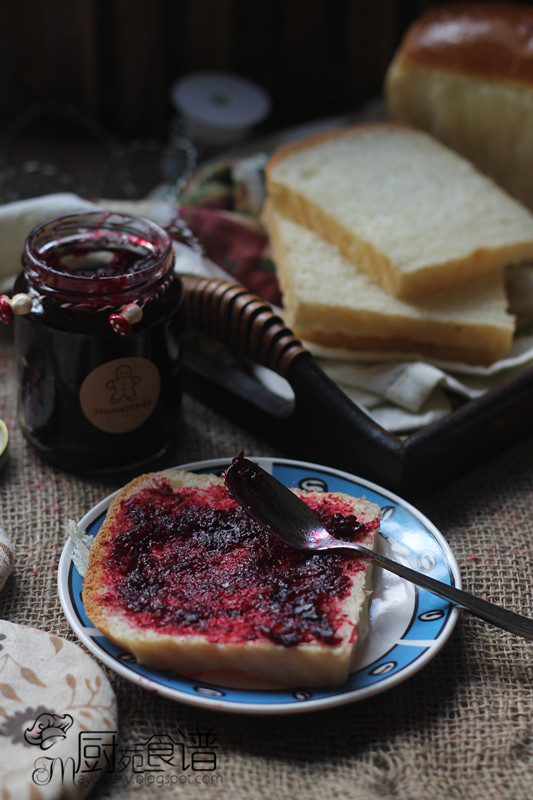
烤了好久的吐司, 终于可以亮相了, 谢谢所分享的夺命吐司! 


酸中带甜的洛神花果酱, 配上白吐司, 好滋味啊!
洛神花果酱食谱参考这里


【夺命吐司, 一次发酵】

材料
260克日本高筋面粉
3克即溶酵母
60克蛋液(1粒)
120克鲜奶
20克细糖
2克盐
30克奶油

做法
1.  将所有材料放入面包机里搅拌15分钟(除了奶油)至面团混合。
2.  然后再加入奶油, 继续搅拌至15分钟至面团顺滑混合。
3.  取出面团, 将面团分割成3等份, 并以擀面棍擀卷2次,摆入涂油的烤盘里,发酵至9分满。 
4.  送入预热烤箱里以170度烘烤40分钟, 如面包表面上色快, 亦可覆盖上一张锡纸。 
  

****450克吐司烤盘 (食谱取自Victoria Bakes)


The Killer Toast】
For 450g loaf pan and just one proofing
 (Recipe adapted from Victoria Bakes
[Ingredients]
260g Japanese bread flour
3g instant dry yeast
1 large egg (60g)
120g full cream milk
20g sugar
2g salt 
30g butter

[Method]
1.  Place all the ingredients (except butter) into the a breadmarker, let it knead for 15 minutes until all the ingredients come together .  (First, add the wet ingredients, then followed by the dry ingredients) 
2.  When all ingredients come together, add in the melted butter, continue kneading until the dough is smooth and elastic for 15 minutes.
3.  Divide the dough into 3 portions equally, then roll flat and roll up like swiss roll ( repeat twice).  place it into greased loaf pan to have of proofing until the dough reaches 90% of height of pan. 
4.    Bake in preheated oven at 170 C for 40 minutes. (Cover bread surface with foil if it turns to brown color too fast) 


以下3张是第一次以长形的吐司模所烤的,觉得它矮矮的。 后来, 终于在机缘之下就着了三能450克的吐司模, 不管它3721的就买了!  


Thursday, 7 January 2016

洛神花果酱 【Homemade Roselle Jam】


若非园里的洛神花盛产,

料想我是绝对不会去采购洛神花并制作果酱。
家中成员之中, 唯独儿子是超爱果酱, 
而那俩个丫头,来来去去不是巧克力酱就是花生酱。
无论是任何一种果酱,皆非丫头们的心头之爱,
也因如此, 橱柜里再无摆放果酱的"容身之地"了!
若非洛神花果的盛产量多如牛毛
已经是送的送派的派了,
然而,所剩余的洛神花果仍然是堆积如山啊!
结果, 拼了命似的煲了数次的洛神花茶,
然后, 再取大量的洛神花果作为干燥的茶叶, 
剥又洗, 然后还得反反复复的拿到太阳底下晒至干燥。
这样才能将它收藏, 而且也方便随时冲上一杯洛神花茶!
再来就是将所剩下的洛神花果,
统统都将它制作成洛神花果酱了!


印象中,好久以前也曾做过一次的洛神花果酱, 并没将它纪录下。 而这一次,虽然食谱已经记载了, 然而却依然无心将它拍摄,制作了2罐而吃完了剩余了最后一罐, 才连同白吐司一起亮相的! 


【洛神花果酱】

[材料]
450克新鲜洛神花果
150克洛神花渣 (煲过的)
100克冰糖
150克麦芽糖
1粒柠檬屑
20克柠檬汁 
250克清水

做法

1.  洛神花除去种子, 取花萼以及花瓣, 以清水洗净数次。
2.  将洗净的洛神和洛神花渣放入果汁机里, 加入清水搅打至碎。
3.  取一锅, 倒入所有搅碎的洛神, 冰糖,麦芽糖,柠檬屑和柠檬汁, 以中火煮滚。 
4.  然后  转小火煮约35分钟至冰糖融化, 必须不时搅拌以防底部烧焦。
5.  待冷却后, 倒入干净的瓶子里, 封瓶盖冷藏保存。 (可冷藏长达数月)


** 煲过的洛神花渣不要将其丢弃, 可以用来煮成果酱。  


【Homemade Roselle Jam】

[Ingredients]
450g fresh roselle fruits
150g roselle residue 
100g crystal sugar
15og maltose
lemon zest from one lemon
20g lemon juice
250g water

【Method】

1.  Separated the red calyx from the seedpod.  Once they are separated, rinse them few times until they are no excess residue.  
2.  Place all the well rinse roselle and roselle residue in a food processor, add in water and blend until you get a puree.
3.  Pour the roselle puree into a pot, add crystal sugar, maltoselemon zest and lemon juice, and bring it to boil over medium heat.
4.  Then, turn to low heat, stir occasionally to make sure that the sugar has completely dissolved. Cook for about 35 minutes until the jam has thickened. 
5.  Remove from heat, let it cool before pour into dry and clean jars.  Seal and store in the fridge.  ( It can be refrigerated for several months)


** Do not discard the roselle residue, it can be used to cook jam.


图中的洛神花果, 已经采了数次以下的份量了! 


Related Posts Plugin for WordPress, Blogger...