Thursday, 10 December 2015

令人着魔的巧克力杯子蛋糕 【Devil‘s Food Cupcakes with Chocolate Frosting】


半年前,在Bake Along 活动时, 
就已经青睐于这款蛋糕了。
将这样排着队伍, 然后就把它忘得一干二净了。
直到最近, 再度邂逅了这款令人着魔的蛋糕, 
这蛋糕的魔力太深了, 
当时的我, 只不过是品尝了一小口,
就深深的对它着了魔!
大丫头吃了我所带回来的魔力蛋糕后, 
说道,是它了,太好吃了。。 这就是我要的蛋糕!
结果, 当然是奔向厨房敲蛋去了, 
否则, 等着等着。。又会将它给遗忘了! 

我用的纸杯稍微大了一些, 所有只做了7个而已。 为了满足大丫头馋嘴的心, 我重复敲了两次的鸡蛋, 做了两次的蛋糕。


【令人着魔的巧克力杯子蛋糕

[材料:约做7]
25克无糖可可粉
30克半甜巧克力  切碎
60克热水 1/4杯)
60 buttermilk (1/4杯)
75克蛋糕粉
1/2茶匙苏打粉
1/4茶匙盐
100克黄糖
45克粟米油
1粒鸡蛋 (去壳63克)
1/2茶匙香精 (我没加)

[
做法]
1.  将可可粉和半甜巧克力放入碗里, 加入热水搅拌至巧克力融化及顺滑。
2.  然后, 加入buttermilk,  搅拌均匀即成巧克力酱, 备用。
3.  将蛋糕粉, 苏打粉过筛, 加入盐, 备用。 
4.  将黄糖,粟油以及鸡蛋以搅拌机打至松发 
5.  将步骤(2)的巧克力酱和步骤(3)的粉类交替分次的加入蛋液里,搅拌均匀即可。
6.  把巧克力面糊舀入备好的纸杯里至8分满, 送入预热烤箱175度烘烤25分钟至熟, 或以牙签插入蛋糕内部时, 拔出来是干净没有粘黏物。 
7.  待蛋糕冷却后, 挤上巧克力奶油霜即可享用。      

【巧克力奶油霜】

[
材料]
90克半甜巧克力, 切碎
1大匙淡奶 
15克奶油
60克 鲜奶油 (1/4杯

【做法】
1.  将巧克力, 淡奶和奶油放入碗里, 隔水加热至巧克力融化至顺滑。 
2.  离火,加入鲜奶油搅拌至均匀。
3.  待稍微冷却后, 放入冰箱里冷藏至巧克力转至浓稠, 取出以裱花嘴挤在蛋糕上即可。 

食谱参考了Anncool Journal 和 Jasline@foodiebaker

Devil's Food Cupcakes with Chocolate Frosting]

[Ingredients]
25g unsweetened cocoa powder
30g semi sweet chocolate
60g boilling water (1/4 cup)
60g buttermilk (1/4 cup)
75g cake flour
1/2 tsp baking soda
1/4 tsp salt
100g brown sugar
45g corn oil
1 large egg (63g without shell)
1/2 tsp vanilla extract 

Method
1.  Combine cocoa powder and chopped chocolate, pour boiling water over it and whisk till smooth.  
2.  Add in butter milk and mix well. 
3.  In a bowl, sift cake flour and baking soda together, add in salt and mix well.  Set aside.
4.   In a mixing bowl, add brown sugar, corn oil and egg, beat the mixture until light and creamy by using electric mixer.
5.  Mix in flour mixture, alternating with chocolate mixture in additions.  
6.  Fill the paper liners 80% full and bake in preheated oven at 175 deg c for 25 minutes until a skewer inserted into the centre comes out clean.  
7. Let cupcakes cool on a wire rack before frosting it .

[Frosting]
90g semi sweet chocolate
1 tbsp evaporated milk
15g butter 
60g whipping cream 

[Method]
1.  Stir chocolate, butter and evaporated milk in a bowl over simmering water until melted and smooth.  Remove from water and whisk in whipping cream, mix well.  
2.  Let it cool and put in the fridge until slightly thicken.  Then, fill a piping bag with nozzle and chocolate mixture.  Pipe the frosting onto the cooled cupcakes .  


Recipe adapted from Anncool Journal 和 Jasline@foodiebaker


This post is linked at Cook and Celebrate: Christmas 2015 
hosted by Yen from GoodyFoodies, Diana from The Domestic Goddess Wannabe 
and Zoe from Bake for Happy Kids.


Wednesday, 9 December 2015

番红花饭 【Saffron Rice】


番红花又称藏红花, 有着象征代表意义的花语“ 等你一辈子”, 让人听了都觉得浪漫极了。 番红花也是一种常见的香料, 同时也被贵为世界上最昂贵的香料。关于番红花有着种种不同的浪漫传说, 也有人说它是缠绕甜蜜恋人的花。 

得以友人赠送了这漂亮的花儿, 感谢你了, 朋友! 立即将这著名的珍贵药材之花, 转变成了我家餐桌上即漂亮又香气的一碟香饭!


【番红花饭, 4-5人

[材料]
2杯白米 (洗净)
650克清水
5粒红葱(切片)
4 瓣蒜米(切片)
2大匙奶油
1 茶匙盐  
数片香兰叶(打结)

** 适量番红花+2大匙热水 (浸泡10分钟)

[做法]
1.  将白米洗净, 加入清水, 放入饭锅里,备用。
2.  热油锅, 加入奶油, 爆香红葱片和蒜片炒至香浓。 
3.  离火, 倒入步骤1的饭锅里, 加盐搅拌均匀。 
4.  煮至水份收干, 洒下番红花水。  
5.  当饭煮熟后, 将米饭搅拌均匀。 (这时, 你将会看到一些米饭是黄色的沾上番红花色。)
6.  配上炸鸡或咖喱鸡一起享用。  

** 孩子们都不喜欢肉桂棒以及豆蔻的味道, 所有我都省略了! 
食谱参考于Sonia


【Saffron Rice】

[Ingredients]
2 cup of rice (wash and drain)
650g water
5 shallots (sliced)
4  cloves garlic (sliced)
2 tbsp butter
1 tsp salt 
few pieces of pandan leaves (knotted)

** adequate of saffron + 2 tbsp hot water (soak for 10 minutes)

[Method]
1.  Wash and drain rice, add in water and pandan leaves, set aside.
2.  Heat up the frying pan, add in butter, shallot and garlic, saute until fragrant. 
3.  Remove from heat, pour the mixture into the rice and add in salt and stir well.
4.  Cook using the rice cooker until the water almost dries.  Then, sprinkle saffron water on few spots.   
5.  When the rice is cooked, mix well.  ( you will see some of the rice have been coated with saffron colour)
6.  Serve the rice with fried chicken or curry chicken.   

Recipe adapted from Sonia


Monday, 7 December 2015

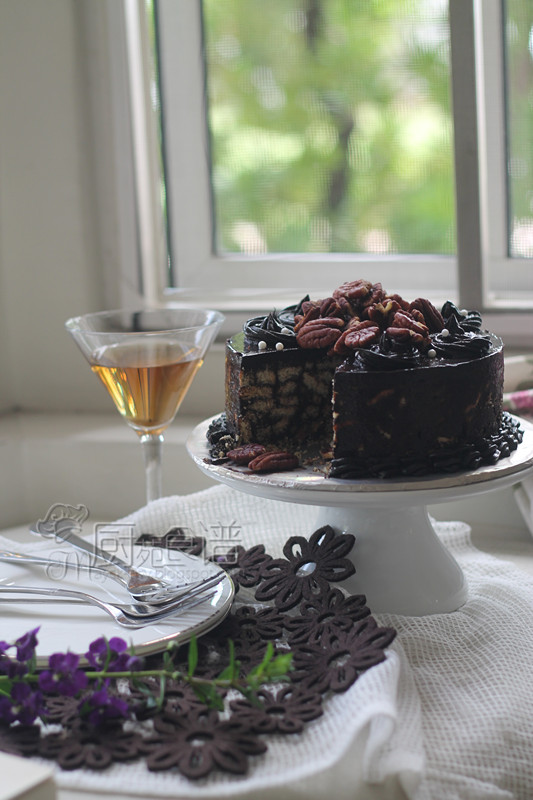
免烤巧克力饼干蛋糕 【No Bake Chocolate Biscuits Cake】


做了这款零失败的蛋糕, 
即好吃又简单的做法, 
试问还有什么能比这款免烤的饼干蛋糕,
更加的容易做啊!
只需花上少少的时间, 也不需要烤箱, 
不消片刻, 就能做出让人垂延欲滴的蛋糕了。
这蛋糕, 它不是最炫
然而, 却是热爱巧克力者拥趸青睐的对象。 
带着浓浓巧克力香的蛋糕, 
味道充满着惊喜,让人 沉醉其中!
特别喜欢内层的饼干花纹, 
富有曲线美的呈现
与巧克力配合得相得益彰,
也显出它的独特风味! 
轻松惬意的下午茶,
 一杯咖啡, 一块蛋糕,
令人一品难忘!


【免烤巧克力饼干蛋糕】

[材料]
400克消化饼干 (捏成小块)
100克核桃 (烤香)
90克黄糖 
45克无糖巧克力粉
80克鲜奶
70克热水
80克奶油
1茶匙香精 (亦可不加)

[巧克力淋酱]
60克动物性鲜奶油
60克黑巧克力 (切成小块)
10克奶油 (切成小块)

 [做法]
1.  将捏成小块状的消化饼和烤香核桃,混合备用。
2.  取一小锅, 加入黄糖和巧克力粉混合均匀, 分次加入热水和鲜奶, 搅拌至均匀。
3.  加入奶油, 以小火约煮5分钟至奶油融化成巧克力酱(过程中必须时而搅拌)。
4.  离火, 待稍微冷却(大约10分钟), 加入香精拌匀。 
5.  然后, 将巧克力酱倒入步骤(1)的饼块中, 以刮刀搅拌均匀至饼干均匀的沾上巧克力酱。
6.  倒入一个6寸活底圆模或慕斯圆模 (如采用慕斯圆模,必需在底部外层裹上一张锡纸), 以汤匙紧按至铺平饼干混合物, 放入冰箱里冷藏大约1小时。  
7.  这时, 将切碎黑巧克力和奶油放入碗里, 然后倒入鲜奶油, 隔水加热并不断搅拌至巧克力和奶油完全融化。   
8.  将温热的的巧克力酱倒入饼干蛋糕上, 静待几分钟至巧克力酱变得平整。 
9.  将蛋糕连模放入冰箱里, 冷藏4个小时以上。  取出, 脱模即可享用。  (脱模时, 以小刀沿着蛋糕模壁或以热毛巾围绕着蛋糕模子)


【No Bake Chocolate Biscuits Cake】

[Ingredients]
400g digestive biscuits (break into small pieces)
100g roasted walnut/hazelnut
90g brown sugar
45g unsweetened cocoa powder
80g fresh milk
70g hot water
80g butter
1 tsp vanilla extract (optional)


[Chocolate layer]
60g UHT whipping cream
60g dark chocolate (chopped)
10g butter (cut into cubes)

[Method]
1.  In a mixing bowl, Combine digestive biscuits and roasted walnut, set aside.
2.  In a pot, add sugar and cocoa powder and mix well.  Gradually add in hot water and fresh milk, mix until incorporated.
3.  Add butter,  simmer over small heat for 5 minutes or until butter is fully dissolved. ( stirring occasionally
4.  Remove from heat, set aside to cool slightly for above 10 minutes and add vanilla extract, mix well.
5.  Then, pour the chocolate mixture over  the biscuit mixture and mix well until the biscuit crust have coated with the chocolate 
6.  Pour the chocolate biscuit mixture into the 6 inches loose bottom pan, use the back of the spoon to press the mixture evenly and place the cake pan into the fridge for about 1 hour.
7.   While waiting the cake to set, place chopped chocolate and butter in a bowl.  Then, add in whipping cream , gently melt the chocolate over water simmering in a saucepan until melted and smooth. 
8.  Take the biscuit cake out from the fridge and pour the warm chocolate mixture across the top of the cake.  Let it cool for a minutes until the chocolate mixture spread evenly.  Place the cake pan into the fridge for 4 hours.
9.  Remove the cake from the refrigerator, slice it and serve. (you may use the hot tower to heat the sides of the pan to make it easier to remove)

 Recipe adapted from Home Cooking Adventure


Related Posts Plugin for WordPress, Blogger...