Sunday 30 October 2016

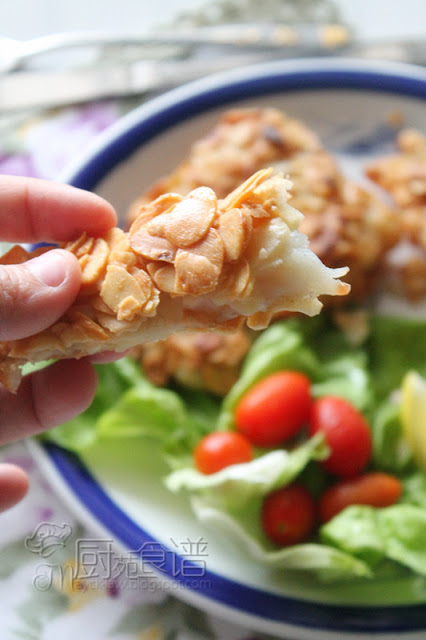
杏仁鲨鱼片 【Almond Shark Meat Fillet】


平时在菜市上很难看到鲨鱼肉, 记得只看过一次, 而且是大大只的鲨鱼。  听妈妈说过,大只的鲨鱼肉非常粗糙不好吃, 肤浅的我对于鲨鱼肉并不熟悉。   所以每次总是妈妈买”便便“包装好带给我的, 幸福的我哦! 家乡的菜市里所卖的鲨鱼都是中等式的小鲨鱼, 很少见到大只的。

上一趟回乡, 逛了家乡的巴杀, 买了十几只的鲨鱼。  平时总是将鲨鱼肉切片煮酸甜鱼片,今天就顺从小丫头之意, 来个炸鱼片吧! 


【杏仁鲨鱼片】

材料
1只鲨鱼肉 (家乡买的, 经已剥皮)
80克杏仁片

调味料
1茶匙盐, 适量胡椒粉
**4大匙面粉+3大匙清水+1粒鸡蛋 (调匀)

做法
1.  将鲨鱼切半, 除去硬骨,滴干水份, 加入1茶匙盐和适量胡椒粉腌制15分钟。
2.  将腌好的鲨鱼放入面粉蛋糊(**)里浸泡一下, 取出, 将外层沾满杏仁片并按紧。然后, 放置冰箱里15分钟, 这样油炸时杏仁片就不容易脱落了。
3.  取一平底锅, 热适量炸油, 将杏仁鱼片炸至香脆或杏仁片呈现浅褐色。(油炸的过程中, 必需不时的将热油淋在杏仁上)
4.  离火, 对半切块, 挤上适量柠檬或配搭辣椒酱和即可享用。


【Almond Shark Meat Fillet】

【Ingredients】
1 shark meat (bought from hometown, remove skin)
80g almond slice

Seasonings
1 tsp salt, a dash of pepper
**4 tbsp flour, 3 tbsp water, 1 egg (mixed)

Method
1.  Cross-cut shark meat into half, remove hard bone and drain it.  Marinade shark meat with 1 tsp salt and pepper for 15 minutes.  
2.  Place the shartk meat into flour batter and soak for a minutes.  Then, coat well with almonds slice and press it.  Place it in refrigerator for 15 minutes to avoid almond fall off during the frying. 
3.  Take a pan,  heat up of fry oil and place in almond fillet and fry until cripsy or the almond slices turn into light brown.  
4.  Remove from heat, cut the fillet into half, serve with mayonaise and chili sauce.


Friday 21 October 2016

奥利奥咖啡蛋糕 【Oreo Coffee Cake】


该为小丫头筹备怎样口味的生日蛋糕?巧克力? 不啦, 大丫头才是巧克力的恋人。  我真的绞尽脑汁的想着, 小丫头没有特别喜爱的口味, 但却不是什么口味都吃。  问了她几次, 她总是回答着“不必做啦, 妈咪, 太麻烦了!"  这就是她了, 善解人意乖巧的她。 

无可奈何之下, 就来个乱乱拼出来的~咖啡加奥利奥的交响曲!。 


这蛋糕深深获得家人的喜欢, 浓浓的咖啡味, 每人一块没一会又再来第二块了。 老规矩哦, 非得留下一块来拍下美照, 嘻嘻。。


【奥利奥咖啡蛋糕, 一个7寸圆形活底蛋糕模

材料
4粒蛋黄, 20克黄糖, 50克粟米油, 50克鲜奶, 50克奥利奥饼干碎, 85克蛋糕粉
1包即溶咖啡粉 (1包20克+ 10克热水, 调匀)
4粒蛋白, 50克细糖, 1/2茶匙苏打粉 

蛋糕夹心
250克植物性鲜奶油, 1茶匙咖啡精, 适量kahlua 咖啡酒 (涂抹蛋糕片)
(将鲜奶油打发, 然后再加入咖啡精, 继续打发2分钟即可)

巧克力淋面
50克黑巧克力(切碎), 2+1/2大匙鲜奶, 6克奶油(溶化)
(将鲜奶, 黑巧克力, 牛油一起隔水煮至溶化顺滑。 稍微冷却后, 淋在蛋糕的边缘上, 让巧克力酱自然流下。)

蛋糕表面装饰
奥利奥饼碎, 烤香杏仁碎 

【蛋糕体做法
1. 将蛋黄和黄糖拌匀, 加入粟米油和鲜奶拌匀。
2.  然后加入蛋糕粉搅拌均匀后, 再加入奥利奥饼碎, 拌匀备用。
3.  将蛋白和苏打粉以搅拌机搅打至起粗泡, 再把黄糖分3次加入, 以搅拌机搅打至硬性发泡。
4.  把蛋白霜分2次加入蛋黄糊里, 以搅拌刀拌匀。 
5.  将咖啡蛋糕糊倒入7寸圆形活底蛋糕模里, 放入预热烤箱以170度烘烤40分钟。  
6.  取出, 倒扣。  待完全冷却后, 将蛋糕切成3片。 备用。   

【 综合做法】
1.  将一片咖啡蛋糕放在蛋糕架上,然后涂上适量kahlua 咖啡酒。
2.  铺上一层打发鲜奶油(65克), 再撒上适量奥利奥饼碎。  
3.  盖上第二片咖啡蛋糕, 稍微把蛋糕压一下, 再倒入第二层打发鲜奶油,撒上奥利奥饼碎, 重复以上的步骤至到把蛋糕完整的贴上。 
4.  将剩余的打发鲜奶油涂在蛋糕的表面, 抹平。  
5.  然后,将蛋糕放入冰箱冷藏1小时至定型后方可取出淋上巧克力淋面。(只淋蛋糕的边缘)
6.  撒上奥利奥饼碎和烤香杏仁碎或摆上自己喜欢的装饰即可。


【Oreo Coffe Cake, 7 inches round cake mould

[Oreo Coffe Base]
4 egg yolks
20g brown sugar
50g corn oil
50g fresh milk 50g oreo biscuit crushed
85g cake flour
1 package instant coffee (20g coffee + 10g hot water, mixed)

4 egg whites 50g brown sugar, 1/2 tsp soda powder

Whipped cream filling
250g ever whip cream,  1 tsp coffee essence , Kahlua coffee liquid ( apply on cake)
(Whipped cream, and add in coffee essence, then continue whisk for 2 minutes)

Chocolate Ganache
50g dark chocolate (chopped)
2+1/2 tbsp fresh milk
6g unsalted butter (melted)
(Pour chocolate ganache over the edge of the cake,  let it flow naturally.)

【Decoration
oreo biscuit crushed, roasted almond crushed

[Method]
1) In a bowl, place egg yolks and sugar together, use a hand whisk to mix until combined.  Add corn oil, fresh milk, coffee liquid, oreo cookies crushed and sifted flour, and mix well.
2) In a mixing bowl, beat egg whites until mixture forms soft peaks.  Gradually add in brown sugar, beating at high speed until frothy and stiff peaks form. 

3) Gently fold in 1/3 of meringue into egg yolk batter, mix well by using  a rubber spatula, then add the remaining meringue until blended.
4) Pour batter into ungreased 7-in cake pan.  Bake in preheated oven at 170C for 40 minutes or until cooked.
5) Remove from oven, invert cake onto table, leave to cool before cutting into 3 layers.

【 To assemble cake】
1.  Place the 1st slice of coffee cake on cake stand, then apply some kahlua coffee liquid on the layer of cake. 
2.  Spread with whipped cream (65g), then sprinkle with oreos crushed on top of the cake.
3.  Cover with the 2nd layer of cake, repeat the same way till the last layer.  
4.  Cover the whole cake with the balance of the whipped cream and smooth the side and top.  Chill the cake for 1 hours.
5.  Pour chocolate ganache over the edge of the cake,  let it flow naturally.
6.  sprinkle with oreos crushed and roasted almond crush or decorate as shown or to your own desire.


连续2天的早出晚归,也让这块切片的蛋糕苦等了2天。  第三天回到家又是夕阳西下时,此时此刻只能抓住刚放学回来的小丫头在花园里咔嚓几张了。拍完后, 她兴高采烈的说”等了2天, 我终于可以将它吃掉了! 耶耶!“


摇曳的蜡光中, 生日歌唱完了, 愿也许完了。 望着她那充满信心的神情,她真的长大了, 不再是当年的那个小小女孩了。 但愿随着蛋糕的蜡烛灿烂星光, 幸福永远围绕着她左右。  


我吃了哦!


Monday 17 October 2016

乌达臭豆炒饭【Otak-Otak Fried Rice with Petai】


乌达 (马来文为Otak-Otak), 是以鱼肉以以及各种的香料混合而成, 然后再以亚答叶来包裹或以冷藏盒装方式保存。  乌达, 也是麻坡具有代表性的美食之一 。

乌达是他的最爱, 不管是蒸或烘烤式,皆他所爱。 而我却和他恰恰相反,不怎么懂得欣赏这款威名远播的麻婆美食。在一次机缘下, 品尝过了乌达炒面的美味后, 家里的餐桌上就陆陆续续的出现了乌达炒饭啦, 炒面啦, 炒粿条等等。  


乌达炒饭,从没做过记录。  为了消灭他所带回来麻坡乌达, 家里再度陷入乌达香味飘逸里。  乌达炒饭, 任有你随意的炒, 都是美味的。  


【乌达臭豆炒饭, 3人份】

[材料]
400克白饭
1盒鱼肉乌达
90克臭豆(剁半, 去芯)
1粒大葱(切碎)
2粒鸡蛋 
1棵青葱(切粒)
适量虾子

【调味料】
1 茶匙盐, 1大匙蚝油, 少许胡椒粉, 1或2大匙清水

【做法】
1.  锅里热3大匙油, 爆香葱碎, 加入虾子炒至香浓。
2.  加入臭豆略炒片刻, 加入乌达炒至均匀。
3.  加入冷饭翻炒均匀, 将饭推在锅的一边, 加入适量的油, 将鸡蛋敲入锅中间, 煎至蛋液稍微变浓厚。

4.  然后, 将饭粒盖在鸡蛋上, 加入调味料翻炒均匀, 试味, 加入青葱粒即可盛起。  (若饭粒过干, 亦可加入1 或2 大匙清水, 从锅边满满的撒下)


【Otak-Otak Fried Rice with Petai】

[Ingredients]
400g cooked rice
1 box fish otak-otak
90g petai (halves and cored, )
1 onion (chopped)
2 eggs 
1 chopped spring onion
some prawns

【Seasonings】
1 tsp salt, 1 tbsp oyster sauce, a dash of pepper, 1 tbsp water (optional)

【Method】
1.  Heat up 2 tbsp oil in hot wok, saute chopped onion, add prawns stir-fry until fragrant.  
2.  Add petai and otak-otak, stir-fry until aromatic.
3.  Add in cooked rice, stir-fry over high heat until well combined  Push the rice to the side of the wok, then crack egg to the centre and keep stirring until well combined and slightly dry. (may add 1 or 2 tbsp water if the rice is too dry)
4.  Add in seasonings, toss well.  Taste and sprinkle with spring onion.  serve hot.


Tuesday 11 October 2016

芒果巧克力杏仁慕斯蛋糕 【Mango Chocolate Almond Mousse Cake】


最怕做生日蛋糕了, 怕涂鲜奶油, 怕不知该如何装饰蛋糕。  儿子的生日蛋糕,每年下的订单都是芒果口味, 今年也不例外咯。  但为了大小丫头也有能“帮口”吃, 我找来这款既有芒果口味又有巧克力的蛋糕, 这样人人都有份吃了,一举两得呀! 


当大小丫头看了切片的蛋糕后, 同声同气的说" 哟! 我将芒果的部分切给哥哥, 这样我就可以吃了. 妈咪, 你真聪明!"


【芒果巧克力慕斯蛋糕】

【巧克力杏仁蛋糕体】
4粒大蛋糕 (带壳68克每粒), 分开蛋黄和蛋白
80克黄糖
100克黑巧克力块(切碎)
70克杏仁粉
15克蛋糕粉
50克酸奶 

【做法】
1.  将巧克力隔水煮至溶化, 待凉备用。
2.  将蛋黄和25克黄糖(取自80克黄糖, 余留55克), 搅打至乳白色。  
3.  加入步骤(1)的溶化巧克力和酸奶, 搅拌均匀后, 加入杏仁粉和蛋糕粉, 拌匀。
4.  将蛋白以搅拌机打至起粗泡,再把剩余的55克黄糖分3次加入, 以搅拌机打至硬性发泡。
5.  然后, 将蛋白霜 分2次加入杏仁蛋糕糊里, 倒入7寸圆形蛋糕模里, 放入预热烤箱以170度烘烤40分钟至熟。
6.  取出, 待完全冷却后, 将蛋糕切成3片, 备用。 

【巧克力慕斯材料】
100克黑巧克力块(切碎)
2粒蛋黄
7克吉利丁粉
50克动物性鲜奶油
250克动物性鲜奶油

【做法】
1.  将巧克力隔水煮至溶化, 备用。
2.  取1小锅, 加入50克鲜奶油以小火煮至小滚, 离火。  加入吉利丁粉, 搅拌至吉利丁完全溶化。  (我将小锅子放置在一个装有热水的大锅里5分钟至吉利丁完全溶化) 
3.  加入步骤(1)的溶化巧克力, 搅拌至混合均匀。  然后加入蛋黄拌匀(此刻的巧克力慕斯混合物仍然是带温热的)
4.  将250克的鲜奶油打发, 加入冷却的慕斯混合物里, 搅拌均匀。

【综合做法】
1.  放入一片杏仁巧克力蛋糕片在慕斯模里, 扣紧。  倒入一半巧克力慕斯。  
2.  放入第二片杏仁巧克力蛋糕, 稍微把蛋糕压一下, 再倒入剩余的巧克力慕斯, 最后将最后第三片的蛋糕片贴上。 将蛋糕放入冰箱冷藏至少3小时。(我放置隔夜, 第二日才做芒果慕斯层)

【芒果慕斯材料】
3张吉利丁片(共6克)
50克鲜奶
1粒蛋黄
15克细糖
140克芒果泥(过滤)
170克动物性鲜奶油

【做法】

1.  将吉利丁片以冰水浸软, 然后捞起把水挤干。

2.  将UHT鲜奶+细糖隔水煮热, 离火后, 加入步骤(1)的吉利丁片, 搅拌至溶化顺滑。 待冷却后, 加入芒果泥, 搅拌均匀

3.  将动物性鲜奶油打发, 倒入芒果慕斯里, 混合均匀。

4.  将芒果慕斯倒在蛋糕上, 放入冰箱里冷藏3个小时以上。

【芒果镜面材料】
2张吉利丁片
20克细糖
40克清水
80克芒果泥

【做法】
1.  将吉利丁片以冰水浸软, 然后捞起把水挤干。
2.  将细糖和清水煮至小滚至细糖融化, 加入吉利丁片, 搅拌至完全溶化。 
3.  最后, 加入芒果泥拌匀, 待冷却后倒在芒果蛋糕慕斯上, 放入冰箱里至少2小时以上。

4.  脱模后,涂抹一层打发鲜奶油(我用150克),摆上自己喜欢的装饰即可。


【Mango Chocolate Almond Mousse Cake】

【Chocolate Almond Cake Bake】
4 egg yolks  
25g brown sugar
100g dark chocolate (chopped)
70g ground almond
15g cake flour
50g yogurt

4 egg white
55g brown sugar

【Chocolate Mousse ingredients】
100g dark chocolate (chopped)
2 egg yolks
7g gelatin powder
50g UHT whipping cream
250g UHT whipping cream

【Mango Mousse Ingredients】
3 gelatin sheets (6g)
50g fresh milk
1g egg yolk
15g castor sugar
140g mango puree (sifted)
170g UHT whiping cream


【Mango Mirror Glaze】

2 gelatin sheet (4g)

20g castor sugar

40g water
80g mango puree

** 150g whipped cream

For preparation and method, please refer to the recipe Here~ Berry Lovely, Thanks for sharing!
Original recipe used 9 inches cake pan but I used 7 inches instead.


Related Posts Plugin for WordPress, Blogger...